
March is celebrated as Craft month so I opted to try something new for me, that I wanted connected to spring. The idea was simple but then things got complex. Ultimately, I was looking for the pastels of Ostara and Easter but I had seen a really simple idea using toilet paper rolls. The problem with toilet paper rolls was only painting the bowls afterwards could get me the colours connected to this time of the year. I did try dying the gray pulp and will show you that in a post next week.
Getting this post out now is valuable as letting the bowls dry by themselves takes time. Time that will very quickly be used up as Ostara is just two weeks away! There are two spring projects here. I hope that one or the other is simple and creative enough to give a go, either by yourself or with some young ‘uns.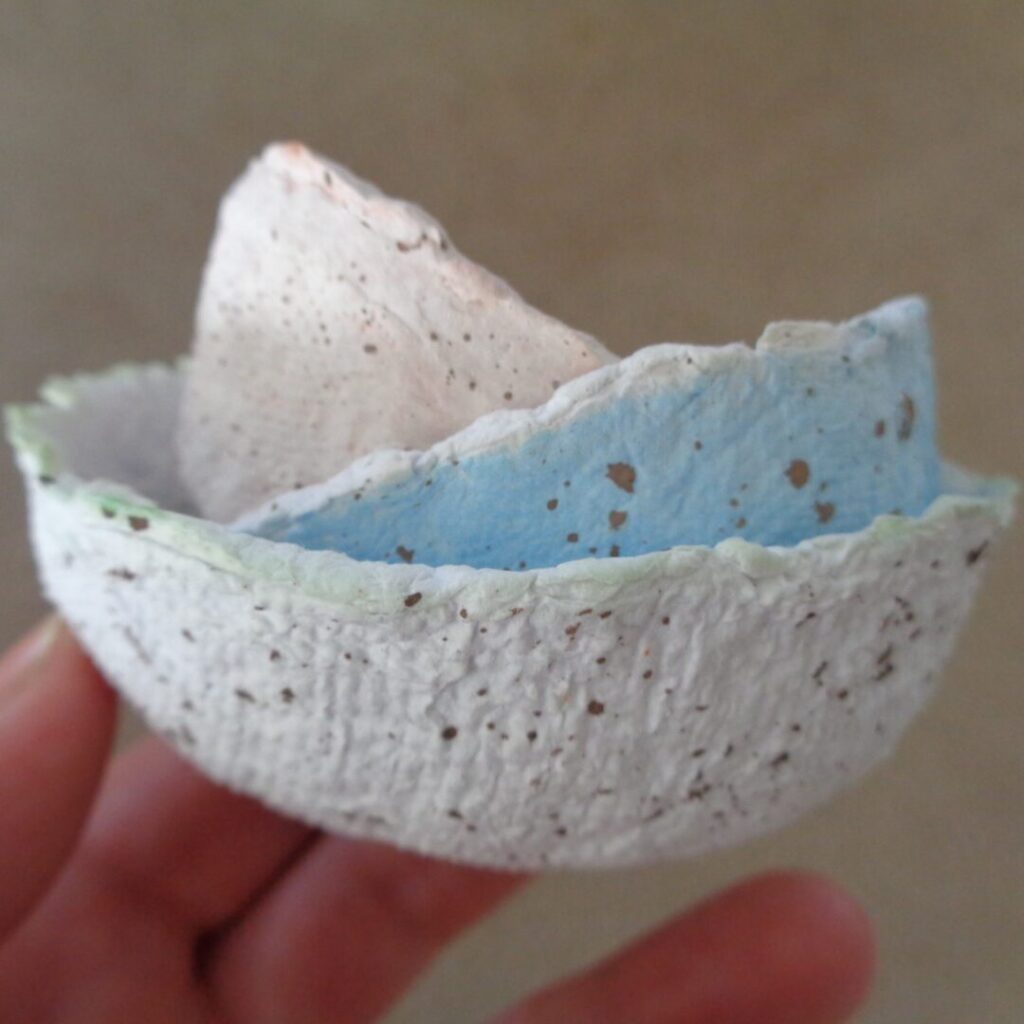
For the first project you will need:
White frizzle paper
water
oil
watercolour paints, in the colours of natural eggs and brown for the speckles
twigs
sieve
glue gun (optional)
 As luck would have it, a parcel arrived with white paper stuffing that was perfect for this project. The kind of paper frizzles you can easily find in a craft store at this time of the year. Plain white paper is another option and there are posts on the internet that use toilet paper. I filled my Magic Bullet 3/4’s full and then filled the container with boiling water until it covered the paper.
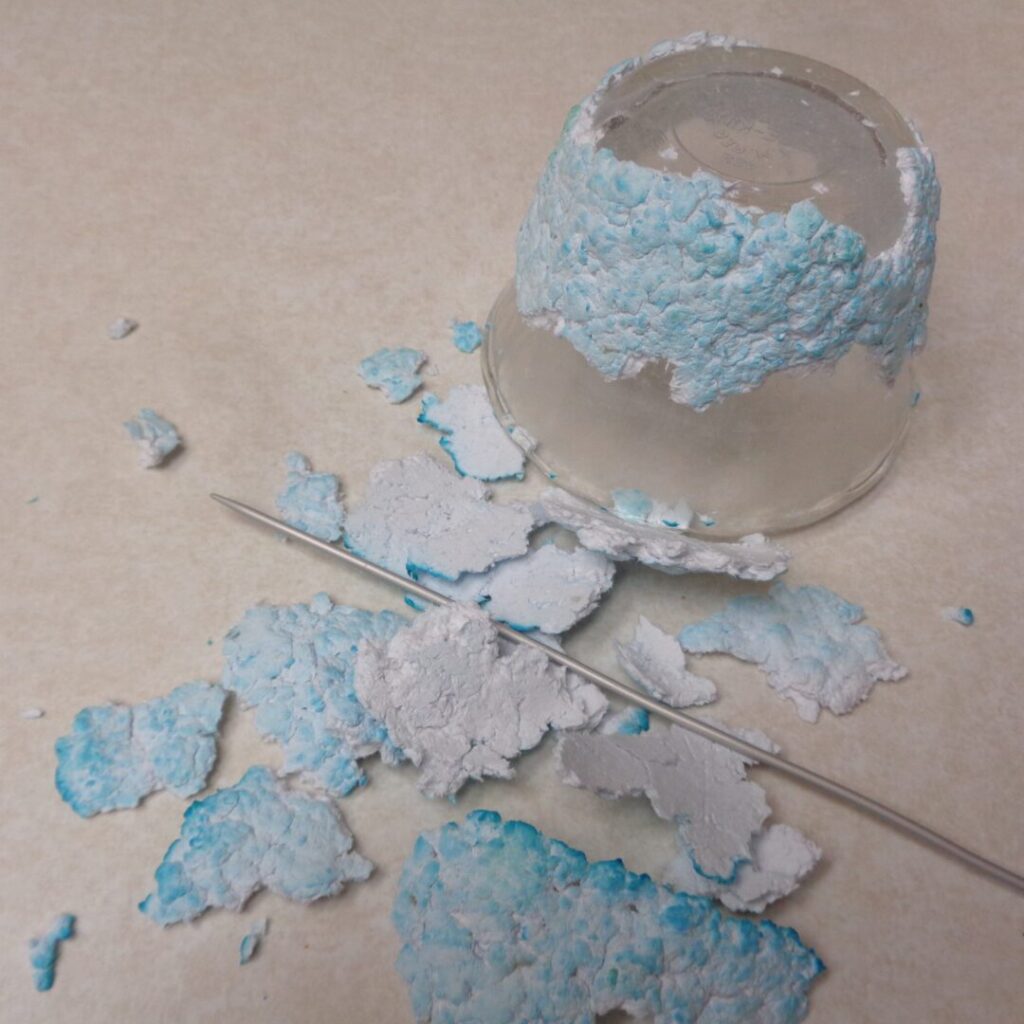
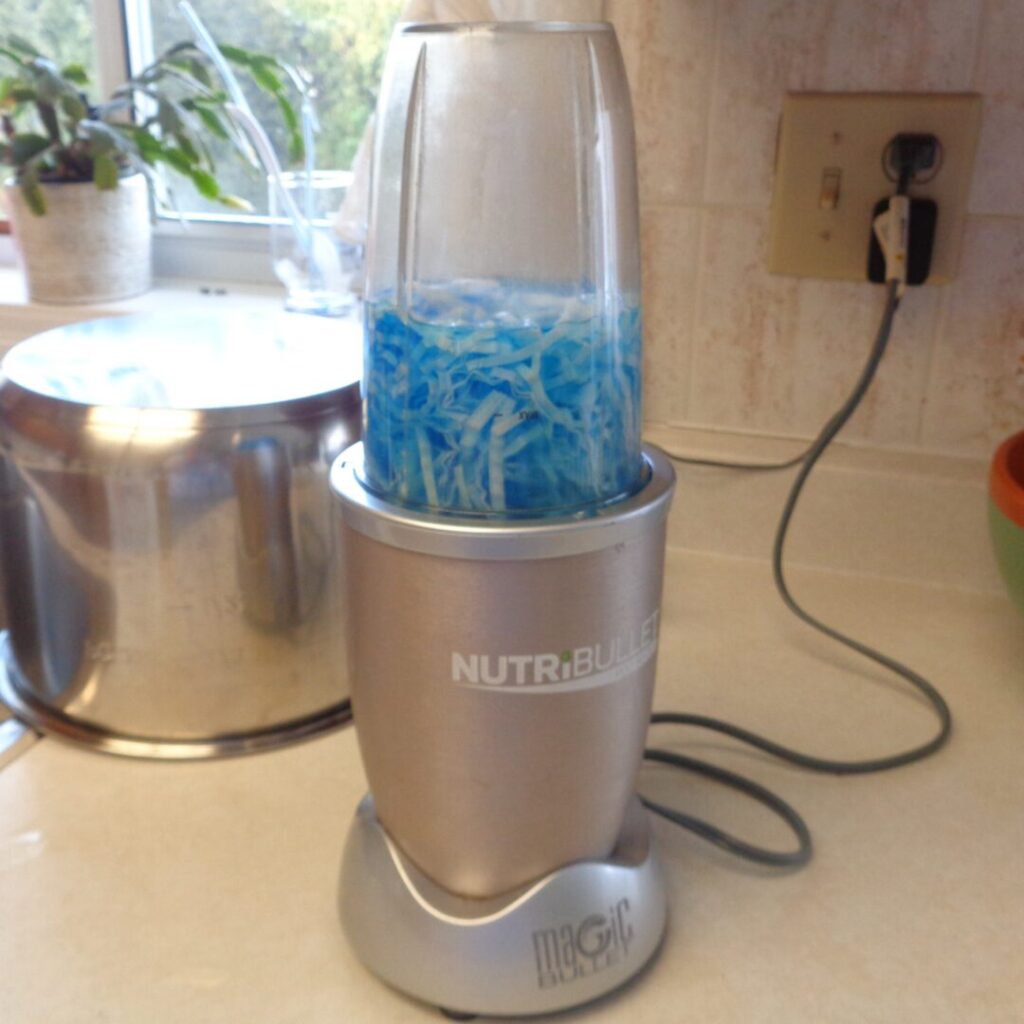 In my first attempt, I added some blue food colouring before turning the processor on. My intention was lessen the need to do as much painting. Not a good plan. For several reasons. As you can see in the picture below all the colour rose to the outside and nothing stayed where there was no air as the pulp dried. So in the next round I stuck to the white colour of the paper.
 Another quick note. Ensure your processing container is fully contained. This was my kitchen with those dyed toilet paper rolls I mentioned earlier in my Cuisinart. Everything ran much more smoothly after this. And now you know, so no need to repeat the learning curve.
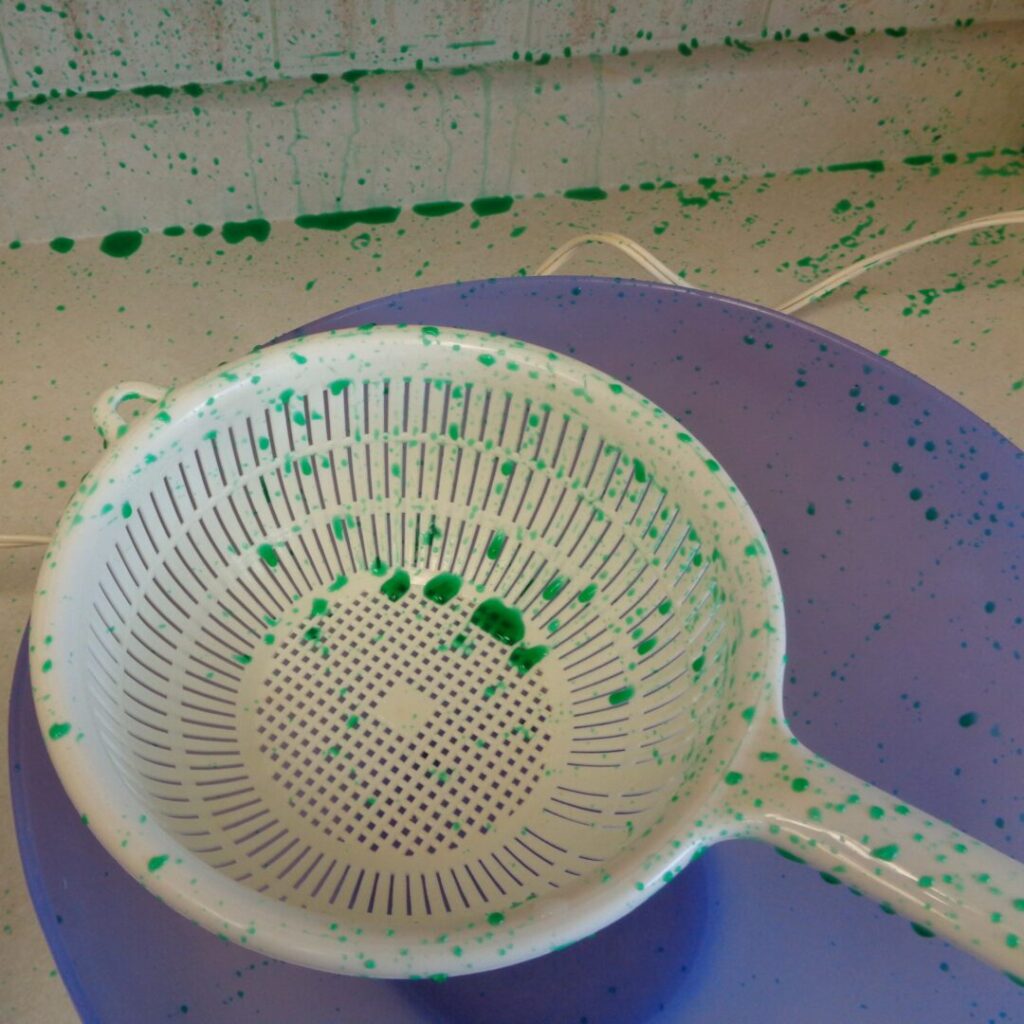 The pulverized paper and water or slurry can now be poured into a cleaned sieve and left to sit. No need to squeeze as that tends to make the paper lumpy. I was up at 4:00am (not intentionally) so I left the slurry to sit and drip until there was daylight to see by before moving on to the next step.
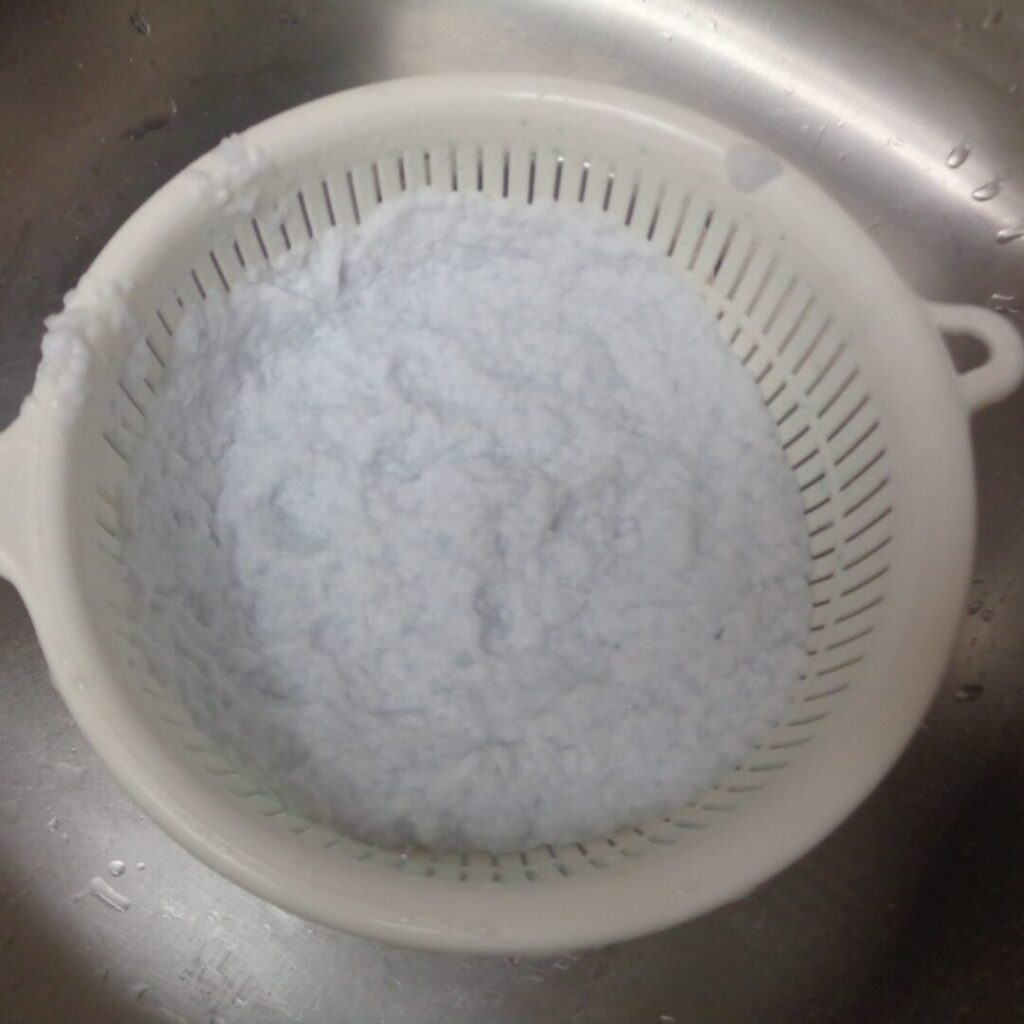 To make the forms, I used sieves. There are three small sieves in varying sizes in my kitchen. They were patted down with oil and the pulp was then pushed into the bowls of the sieves to form the paper bowls. The oil is help for an easier release once the project has dried. Remember the broken blue pieces in the picture above. That was also a “no oil” picture. Use your fingers to compact the pulp, squeeze out the water and even out the thickness of the bowl.
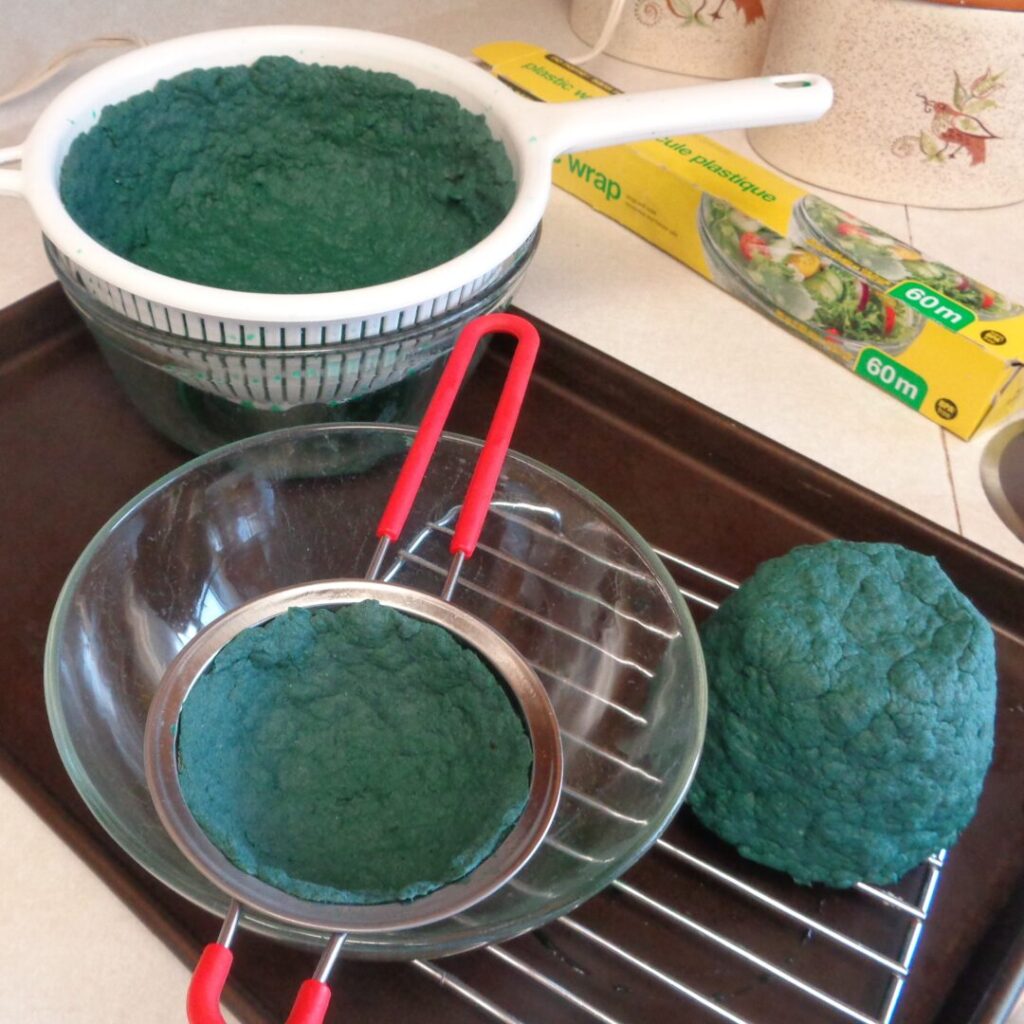
An example of the first such bowl made is front and center in the picture below. The picture itself was of the dyed egg carton/toilet roll project and I will also post those pictures and explanations in a few days. For now, this picture is just to show the process.
 This is where patience comes in. The smaller the project, the quicker the drying time. The thinner the project, the quicker the drying time. The warmer the environment, you get the picture. If that doesn’t work for you, there is always the option of an oven. Heat the oven to the absolute lowest temperature possible and place your projects inside. Turn the oven off and let the bowls sit while the oven cools. Repeat until dry. With no extra help, projects can take from 1 – 5 days to dry depending on a number of factors. The bowls will loosen and come away from the sides on their own once dry.
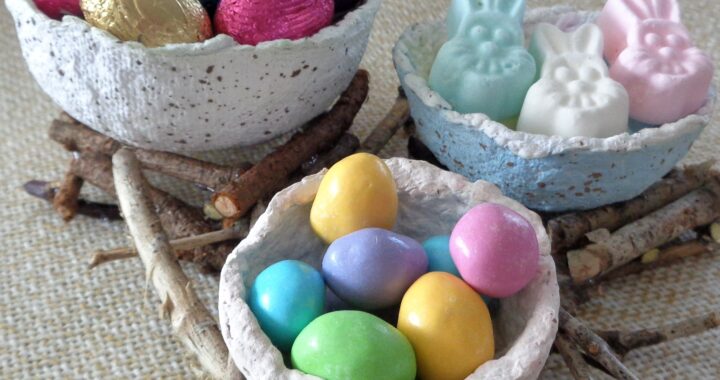
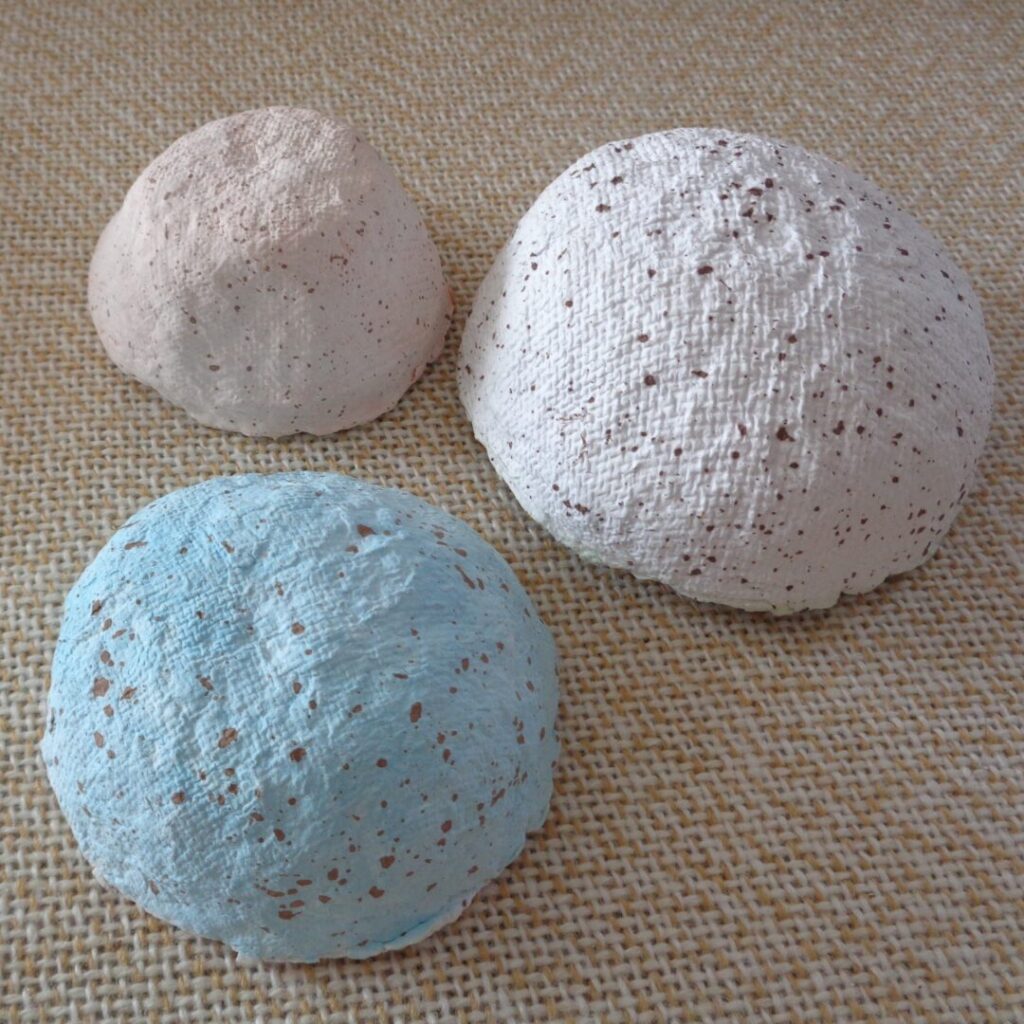
The bottoms of two bowls here were painted in water colours. One a light blue and the other a soft beige, egg colours you would find naturally. All three were then speckled with brown paint and allowed to dry.
 While the bowls are drying, an additional option is to create twig stands for the bowls to sit in/on. The rounded bottoms don’t make them particularly steady. It also helps the display look a little more like an arrangement of nests, a highly appropriate symbol for this time of the year.
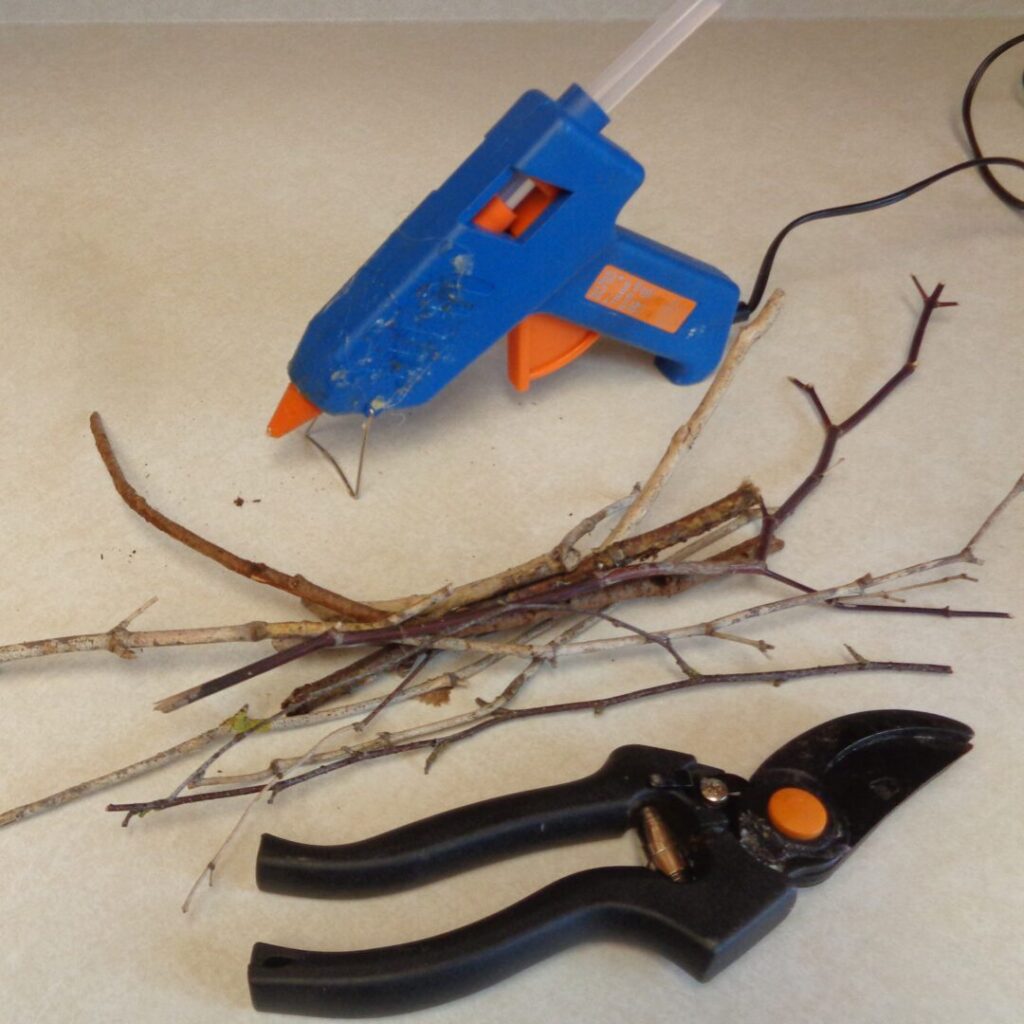 In the end I think I prefer the more relaxed option of just breaking the twigs and placing them around the bowl. They were strong enough to help balance the bowls, even filled and looked a little more natural.
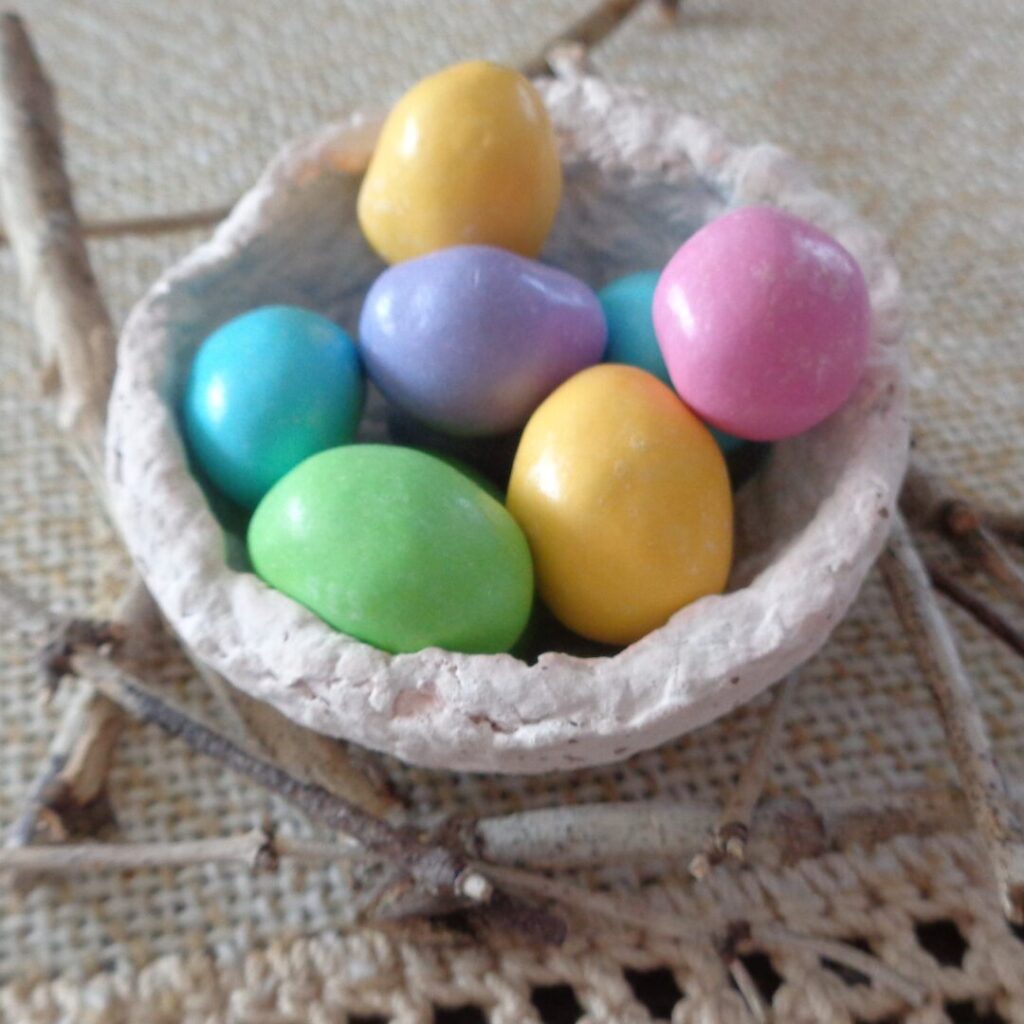 But building a structure works too. It is a good idea to make them a little larger than the bowls so that they can sit down in the “nest”. Fill with your favourite seasonal treats and enjoy.
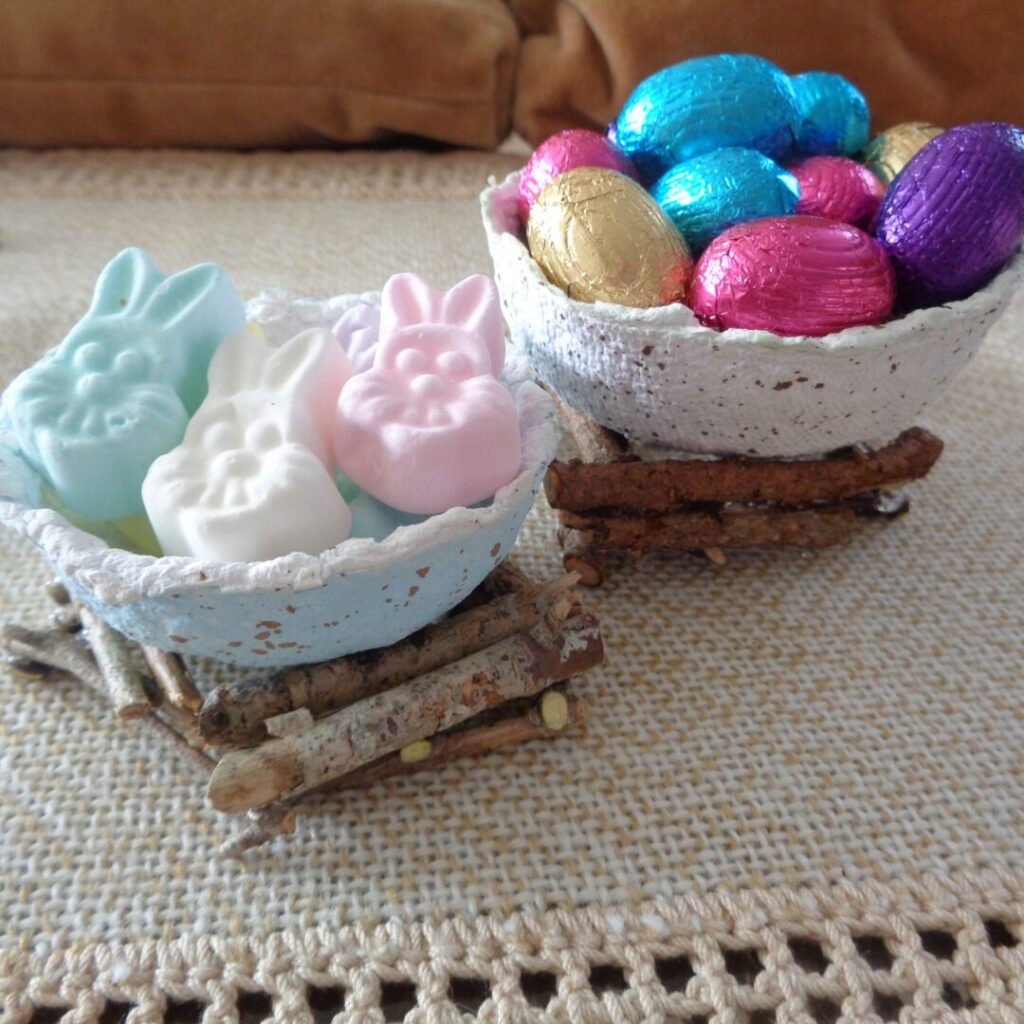 So there you have it. A simple project that really takes just a little advance timing and a few supplies. The second project is for those of you that would like something a little more complex.
 Spring Paper Egg Baskets from My Kitchen Wand
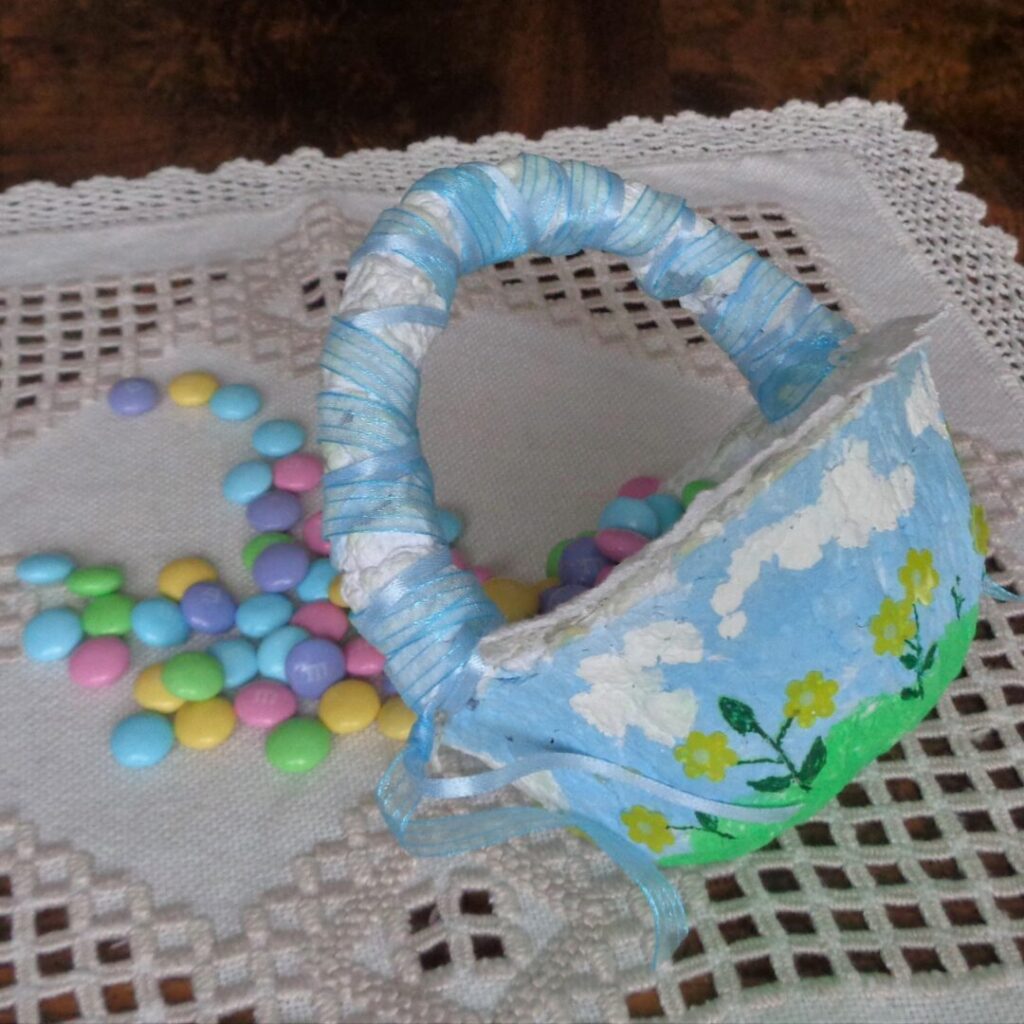
This is more of a proper Easter basket, complete with handle. A project that can be as simple or complex as time and interest allow. It will need a longer drying time so best to start earlier rather than later.
 For the second project you will need :
White frizzle paper
hot water
oil
plastic wrap
2 white pipe cleaners to form the handle
watercolour paints, in the colours for sky, clouds and grass
green felt pen for the plant and leaves
yellow flower stickers
ribbon for the handle ( 2 complementary varieties if possible)
lace, enough to cover the circumference of the basket ( optional)
glue gun (optional)
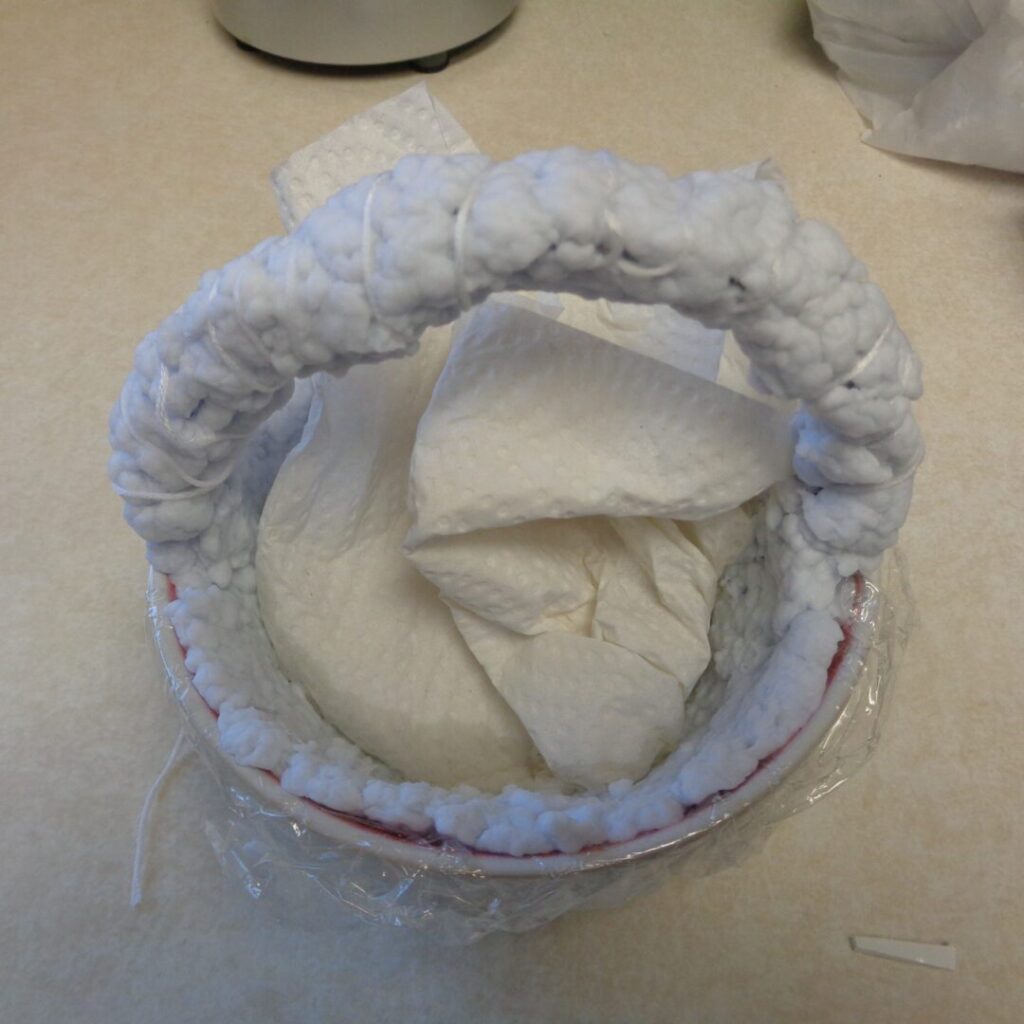
Create the slurry by following the first steps in the instructions above. I used the white frizzle as that is what I had easy access to but if you have access to blue frizzle that is not too dark, it might be worth a try. This time, after letting the pulp sit, line the inside of the bowl of your choice with plastic wrap to help with removal and then pat the inside of the plastic wrap with oil for additional assistance. Transfer bits of drained pulp and begin pushing and patting it into place. This time there will be no place for the water to drain out so using some pieces of paper towel to absorb some of the excess water being pushed around helps quicken the drying time. Place the crumpled paper towel into the center of the bowl and the water will wick up. Two to three times should get rid of the bulk of the extra water that will naturally accumulate at the bottom of the basket.
The handle became a bit tricky and the next time, I may increase the number of pipe cleaners to four and then simply wrap them in ribbon once everything is dry. In this project, I used two pipe cleaners, twisted them together and placed them on the inside of the basket before adding additional pulp to cover and contain them. The pipe cleaners will naturally push to the outside, helping hold them in place. They were then covered in pulp and wrapped in thread to hold everything in place. The little bits and pieces did not really want to hold together and the plan had always been to add a ribbon cover to the handle.
 This project will take longer to dry and is one of the reasons I wanted to post while the month is still beginning.
Water can only escape in one direction and it is thicker than the first project due to the pipe cleaner handle. For kids it is not fun to wait. Please think of this as a several step project that they can come back to two or three times, maybe over several weekends.
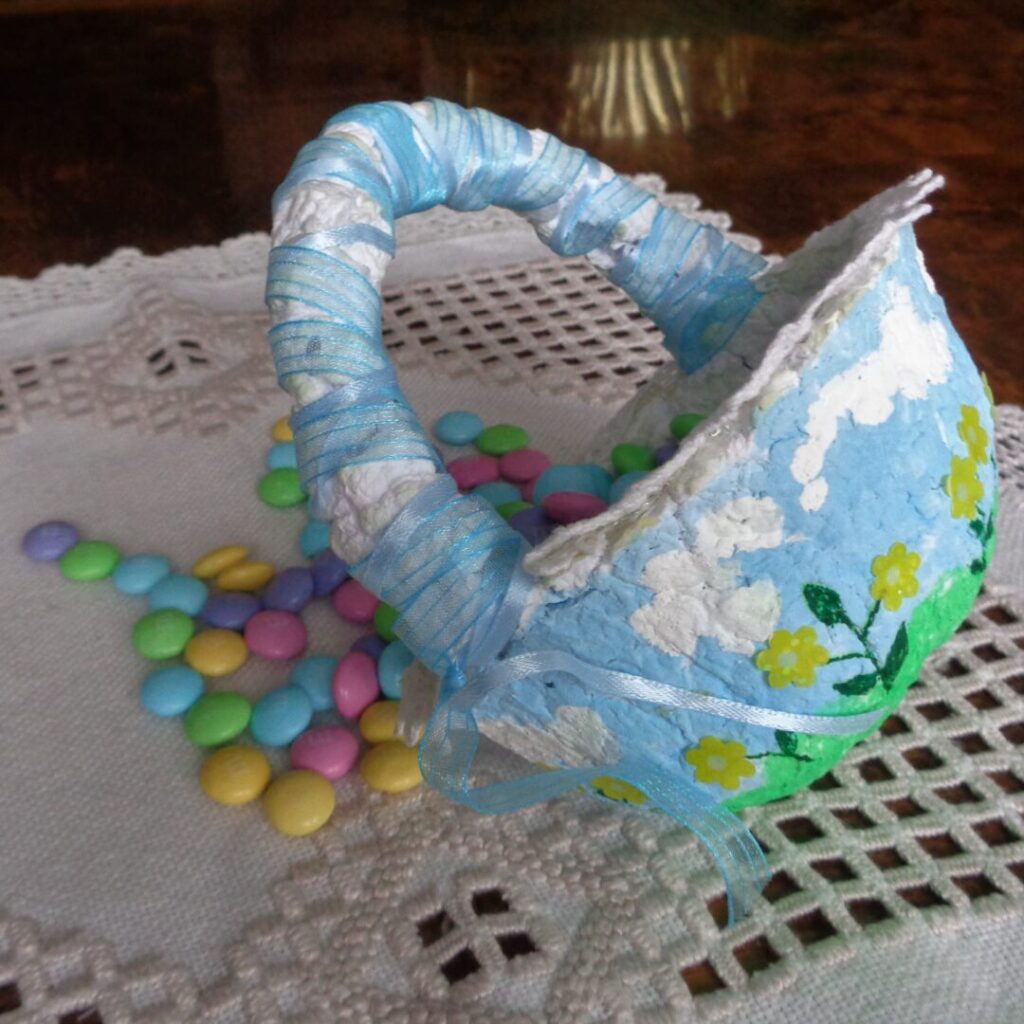
Once dry, remove the paper basket from the ceramic bowl and move on to painting. A light blue for the sky will cover most of the outside. Add an uneven section at the bottom of green grass and some additional white clouds at the top. It is better to paint the clouds on rather than try to sponge them on as the surface of the bowl is not smooth. Up until now these are simple forms that new painters can easily have fun with. Clouds and hills come in many, many shapes. The flowers can easily be created with stickers and the plants themselves are best drawn in with a green felt pen. Be as creative as you would like. Bunnies, lady bugs and colourful tulips are all options.
Wrapping the handle became less of an option and more of a band aid when the paper dried and shrank away from the pipe cleaners in a couple of places. The hole was covered up by a few crisscrosses of ribbon where needed. I used two types of ribbon and wove them back and forth around the handle. The knots at each end of the handle tended to make the ribbons stand away from the basket, so the ribbon ends were clipped and glued to the basket.
 I opted to finish the edge of the basket by gluing on a little bit of lace. That is absolutely a personal choice based on what is handy and where the inspiration is coming from. Laying a pretty handkerchief temporarily inside would work as well, as would leaving the inside as is.
I discovered that Easter M&M’s are the exact same colours as this basket! What luck!
Two spring craft projects, using simple supplies that were just laying around the house.
 Paper Easter Basket from My Kitchen Wand
