
The solar calendar is a fairly modern construct, more associated with neopaganism than one single ancient tradition. Imbolc, Beltane, Lughnasa and Samhain were called “Fire Festivals” before being blended into the solstices and equinoxes to create the Wheel of the Year. Taking a moment though, it is easy to understand how each celebration is an honouring of Earth’s relationship with the sun and the fecund life cycles our sun supports. So whether it is moving cattle between bonfires at Beltain to ensure fertility or hollowing out a turnip to hold a candle at Samhain or the sun itself brightly burning overhead on Summer Solstice, there is always an underlying recognition of the practical, vital role the sun and by association fire holds in our lives.
In Ireland, this time of the year is connected to Brigid, the Goddess of smithcraft, poetry and healing. She is connected to fire through her forge.
Ice cube candles are made with a 1 litre/quart sized paper container, a taper candle, ice and extra melted wax. They can be a single colour (as we are doing here) or a mix of leftover wax bits, a little like the Chianti bottles of old, when different coloured candles used the opening at the top of the bottle as a holder and dribbled down the sides of the bottle as they melted.

You will need for each candle:
1 taper candle of almost any colour and condition (even broken will work as long as the wick holds together)
ice
1 litre/quart waxed container of whipping cream, half and half or milk, EMPTY
More melted wax to pour over the ice cubes. (just over 1/2 the volume of the container) Either reused paraffin or new. If using new wax then you will also need either stearic acid or polybar to harden the wax.
If you choose to do this project without the hardener, your wax will be more translucent and the whole candle will glow more as the flame works its way down inside the form. The flip side is that the wax around the candle will now melt at a lower temperature than with the stearic acid or polybar added. As the candle burns there will be more run off through the holes.
This is not a great project for soy wax.
There are some safety precautions to think about before you get started.
In the picture above is the bottom section of an old electric pressure cooker that I have had in my candle workshop for about twenty years. This is however a case of do as I say and not as I do. Wax is always best melted in a container, in water. That way the wax temperature will never get above boiling. Hot water boils and evaporates. Hot wax smokes and explodes into flames (at about 350 degrees). There is no reason that your wax needs to get any hotter than 180 degrees for this project so melting the wax in a container in hot water is the saftest method to use. If you are not a regular candle maker, try reusing cleaned used tins cans for the wax. They are free and can be pushed together to form a spout.
Wax is lighter than water, therefore the containers once emptied will no longer be stable in the water and will have a tendancy to tip. They will need more wax or something weighty ( like a clean stone) at the bottom of the tin.
The wax can be paraffin you have on hand or some being recycled. Place the wax into a container and set in hot water to melt. Ideally the water should not be boiling but hovering around 180 – 200 degrees. The heat will transfer through the tin can walls melting the wax. When reusing old paraffin, all the additives will already be mixed in and you are ready to pour once the wax is melted. When using new paraffin add a little polybar or stearic acid to the melted wax per the instructions on the package. It will help strengthen the wax. Check with a local supplier for easy sourcing or visit www.wicksandwax.com. You will not need mold release as the mold will be cut away.
There may be some spray if the wax is poured quickly. It will not burn skin but may be a surprise, especially for children. That surprise can result in a tin being tipped or dropped. I always recommend in class to wear long sleeve tops so that there is a level of protection and no surprises.
So lets get started.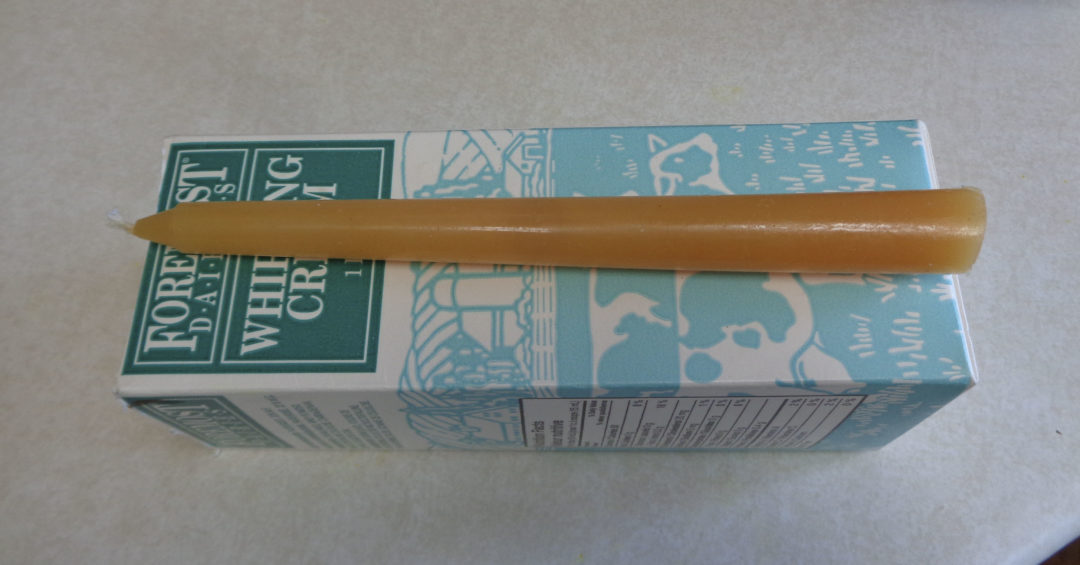
Cut the top of the container off, just below the fold that closes the top section. My experience is that this is better than opening up the container and trying to get the extra height as the folds will show up in the completed candles.
Cut the candle to a similar height. I like to have 1/4 inch extra length for easy lighting. I also dropped the end of the candle into the melting wax so that is becomes part of the pour.
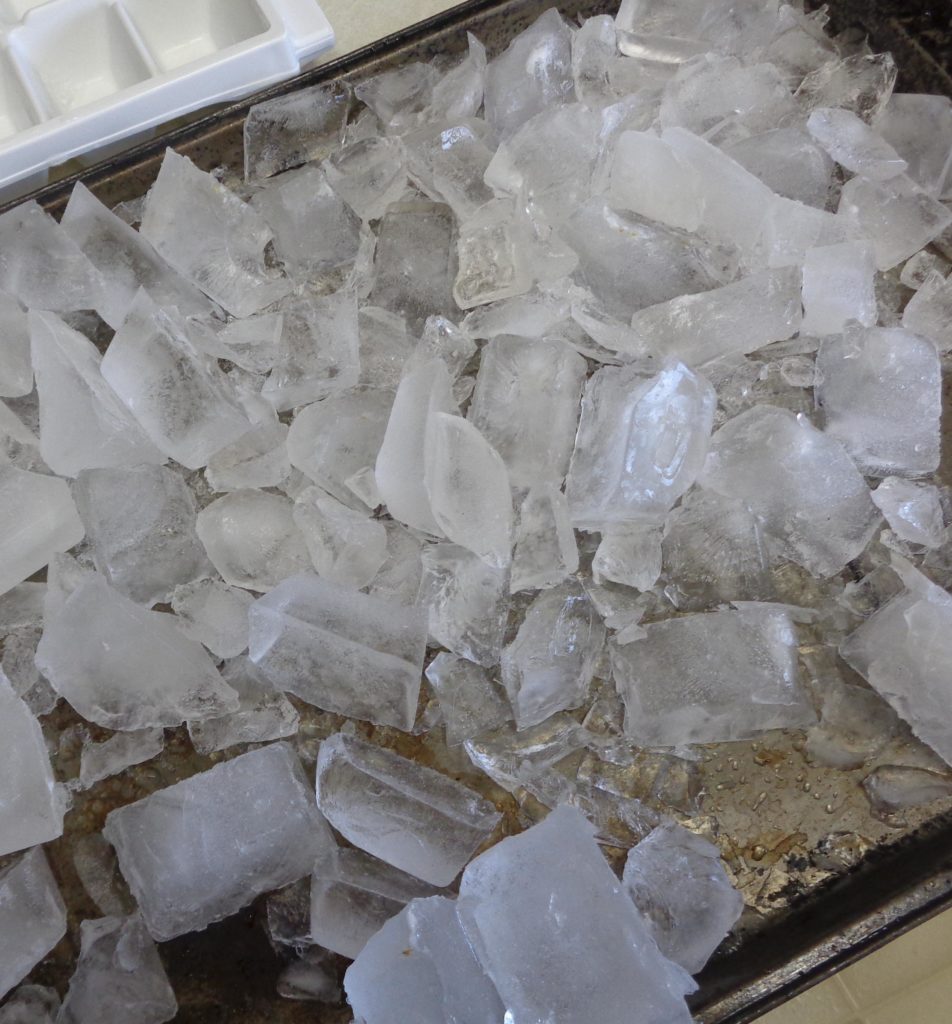
The size and shape of the ice will effect the finished design. Today I am using ice cubes that I made in the freezer.
If you are making lots of candles, there may not be room for all the ice cubes you will need and a bag from the local gas station or grocer may be a better option. Here those ice cubes are not actually cubes but round with a hole down the middle. They make for easy breaking into manageable pieces.
The trick here is have the pieces small enough to fit easily in the container but not so small they melt too quickly when the wax is poured. This will give you less design and more solid places. If the pieces are too large they will not fit into the container or there will be great holes in your final shape. Think in terms of breaking a regular ice cube into three pieces and a round ice cube into two.
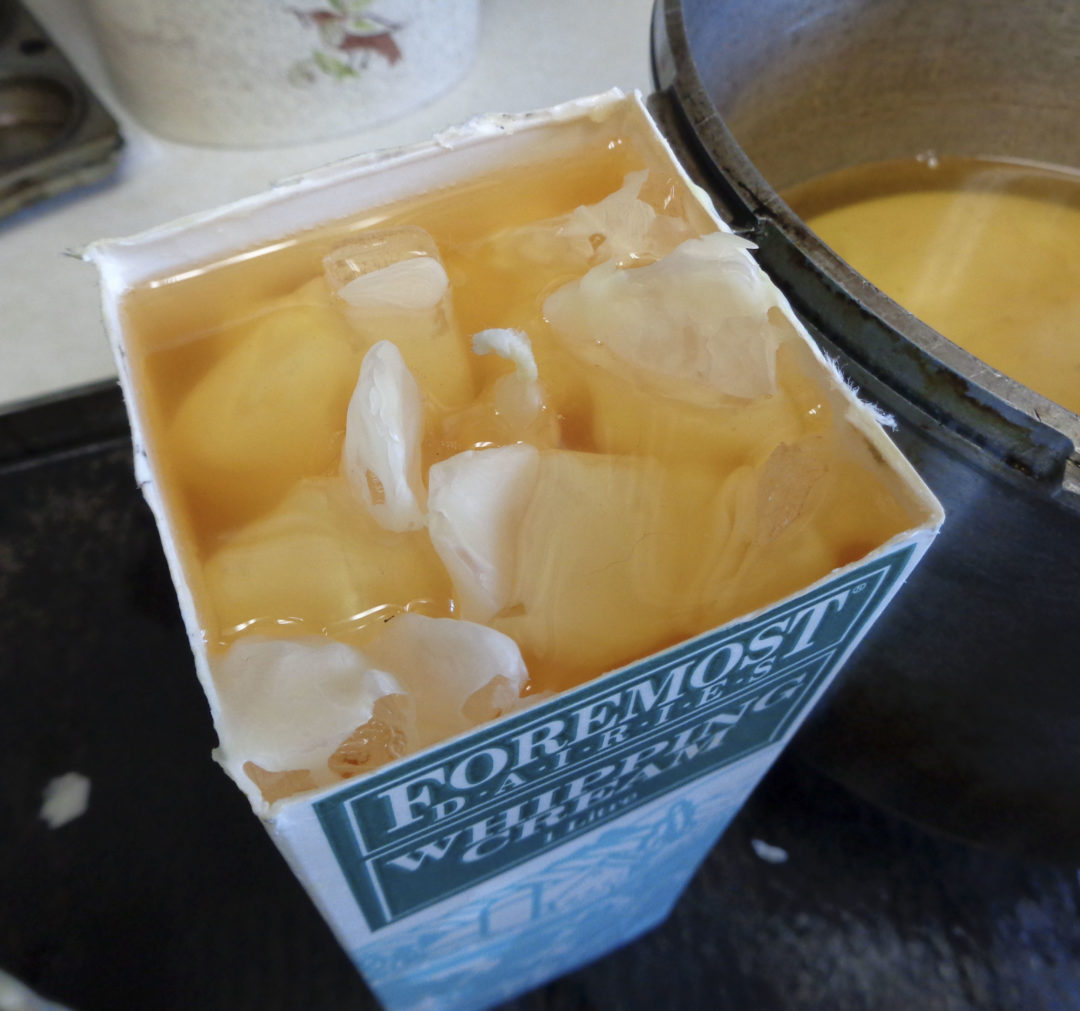
 Place the cut candle in the center of the milk container. Pick out the right sized pieces and fill the space around the candle, keeping the candle in the middle of the container.
Some versions of this candle just use a piece of wick and not a full candle in the middle. The reason I don’t is that if the wick gets wet the flame will die and will not be able to be relit.
Additionally I find the finished product gives a better burn with a consistent wax supply. It may also drip a little more but you are going to put this in a candle holder to keep everthing safe.
Correct?
 Once the container is filled and the candle is in the center it is time to pour the melted wax in.
You will notice I have the candle on an old cookie sheet to protect the counter top. If for any reason the container leaks there will be something to catch the wax. It is not always the wax that is a problem but the colouring in the wax that does not seem to want to leave once it has found a new home.
Pour steadily when doing a solid colour as the ice will very quickly turn the wax solid if poured slowly.
Pour all the way to the top and wait a few minutes. You will probably find you can top up the container in about 5 minutes.
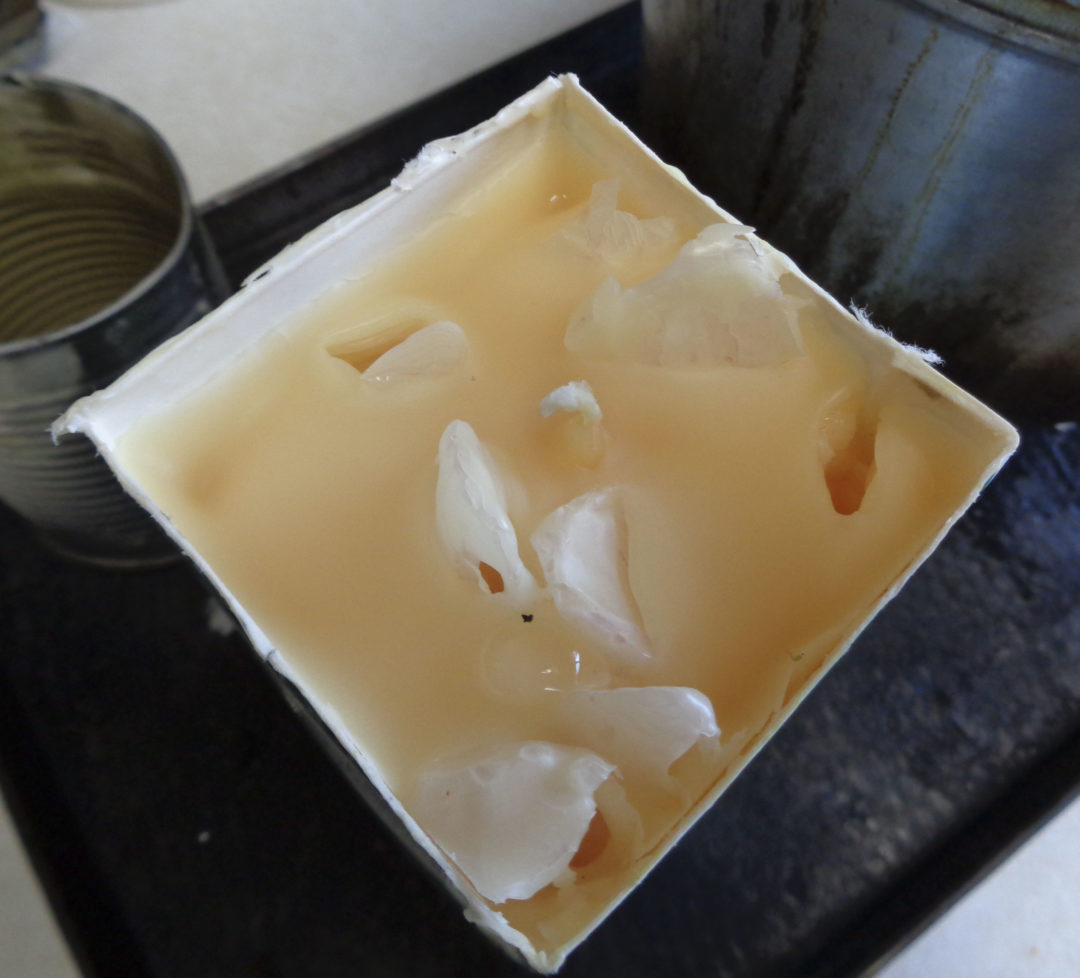
 This is because liquid wax takes up more space than solid wax. In the picture you can see the solid wax on top of the ice pieces and the space that has appeared as the wax cools and shrinks.
Let the container sit until the wax if fully solid, about 30 – 40 minutes. Wax will darken in colour as it solidifies.
In the picture here you can see that except for the places were the ice was, the colour is uniform, telling you the wax is fully cooled.
Turn the candle upside down over a sink and allow the water to drain out.
 As you work you may hear a rattle inside the candle. This can be ice that has not fully melted yet or a piece of wax that has broken off but can not get out.
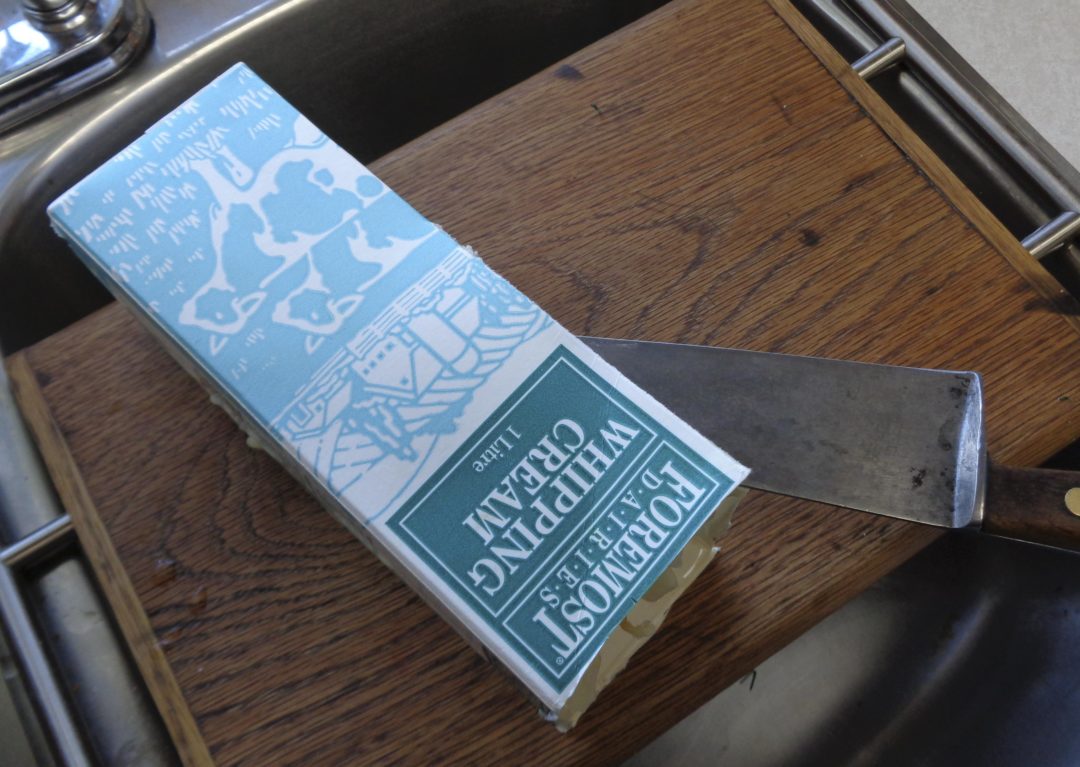
Using a knife cut down the side of the container and open up the “mold”.
There will probably continue to be water dripping out as you can see below.
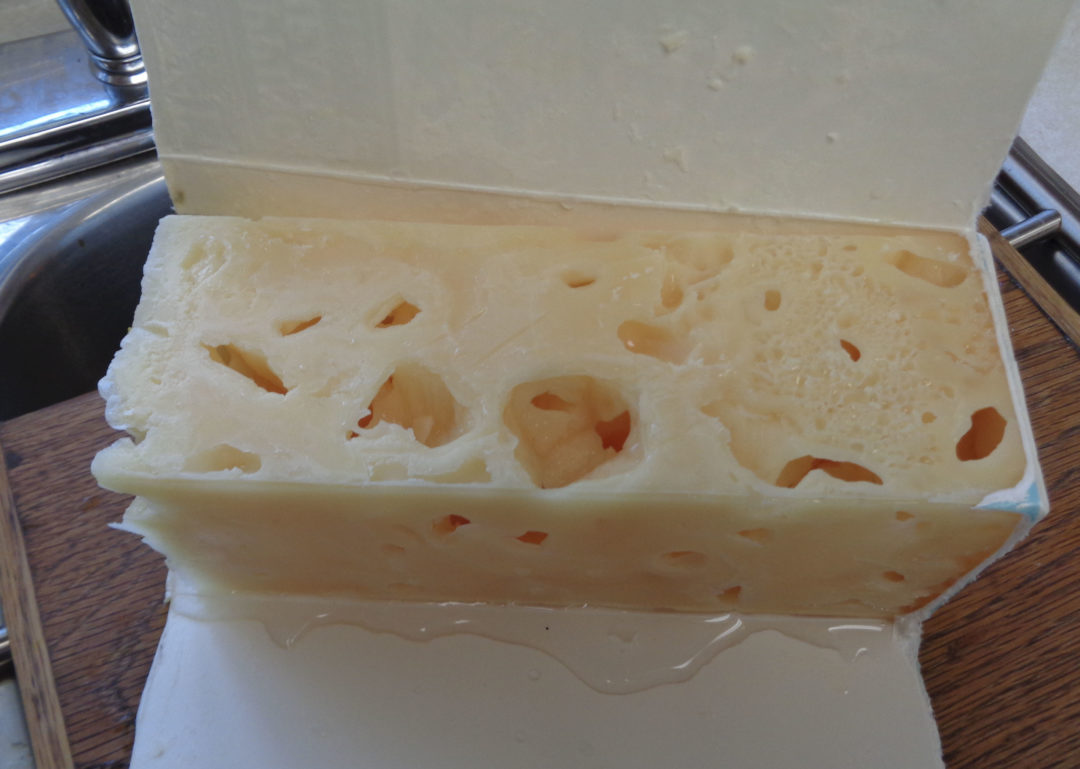
Fully open the carton and take out the candle.
Allow to dry before using.
 Under normal circumstances a melted wax candle should stand for 24 hours before being used but as the candle itself was not liquid there is not the same need to wait.
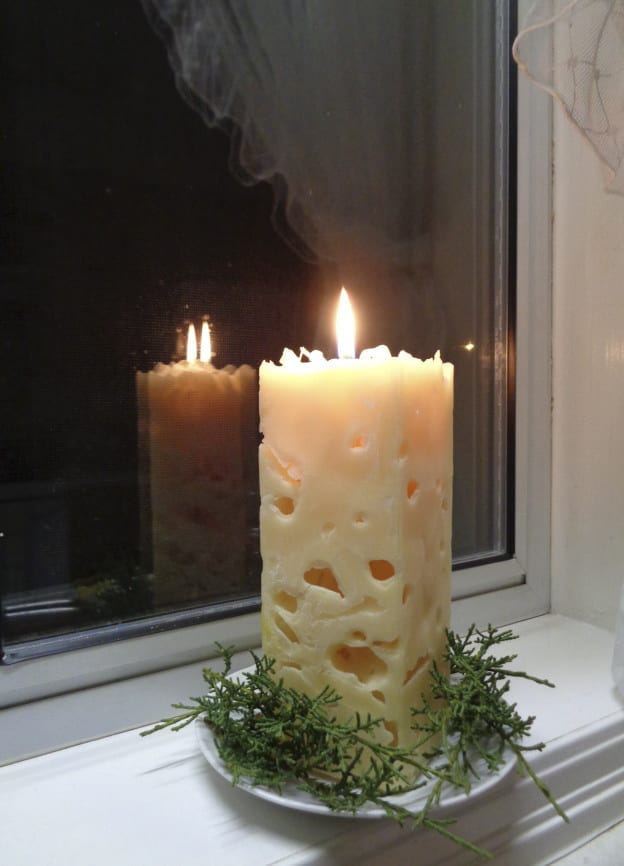
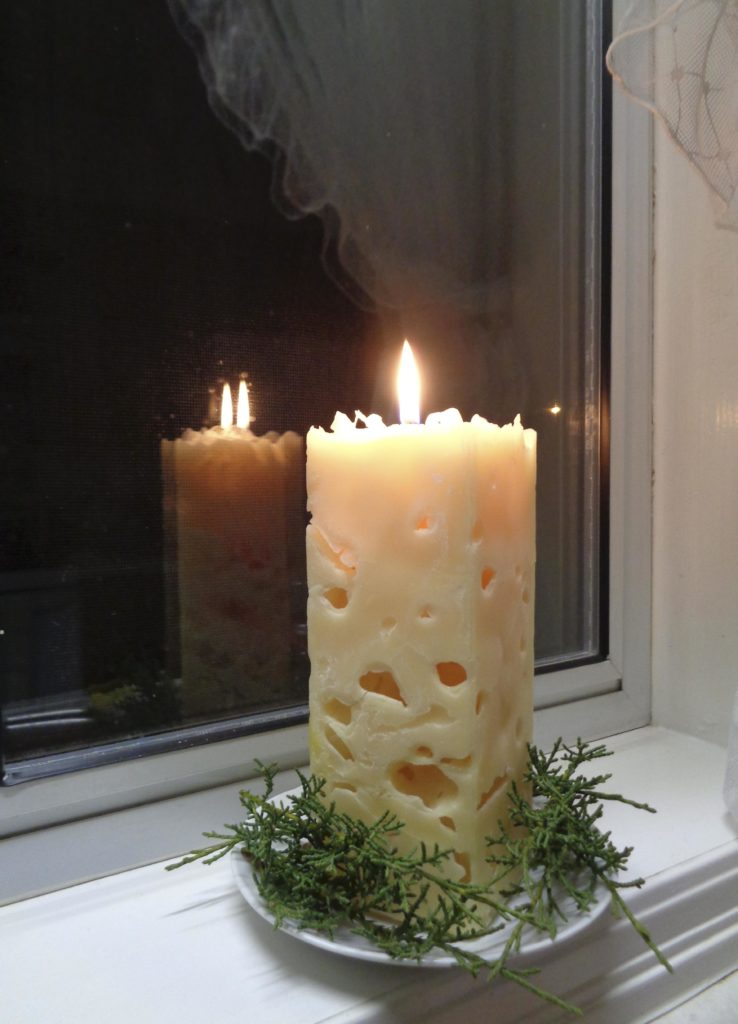
It is however important that these candles be placed on a plate as it is very possible the melting wax will trickle through the holes and down the side of the candles as the candle inside burns down, creating a lovely glow in lighter coloured candles.
The potentially creative part comes if you have candle ends from all sorts of sources. Because there is no way of knowing what kind of wax was used it can be difficult to determine what wick size is best to reuse the left over wax.
 In this process you don’t need to consider that question as most of the wax will not be included in wick size calculations. Combine the ends by colour, whites together, reds together, etc. and melt in separate containers. taking out the remaining wicks once melted. The colours do not need to be identical shades and it is possible to mix colours together as they melt. The wax can be poured in layers allowing each one to cool a few minutes before the next is added. Too quickly and the liquid colours will simply mix together.
The wax can also be poured down one side and the container allowed to cool on an angle before another colour is added. It will be an adventure and no two candles will turn out the same. There is no right or wrong here, just fun and anticipation of the outcome. It is good however to remember your colour wheel as mixing certain colours will only make mud.
Yellow + Red = Orange
Red + Blue = Purple
Blue + Yellow = Green
Whites, yellowsy oranges, pinks and reds are considered traditional Imbolc colours for newness, snow and fire as well as greens and browns for the new spring growth just beginning on the ground. As ever the choice is yours.
In the city of Kildare, Ireland, nineteen priestesses were said to have tended a perpetual flame dedicated to Brigid and later St. Brigid. In the 12th century an attempt was made to extinguish the flame and although it is unclear whether the attempt was successful, success was acheived by archbishop George Browne of Dublin in the 16th century. In 1993, the congregational leader of the Brigidine Sisters, Sister Mary Teresa Cullen relit the flame and the sisters continue their care of it to this day.
Ice candles, a simple craft combining the icy cold of winter and the warming heat of the sun, just in time for Imbolc, Candlemas and St Brigid’s Day.
Ice Cube Candles from My Kitchen Wand
