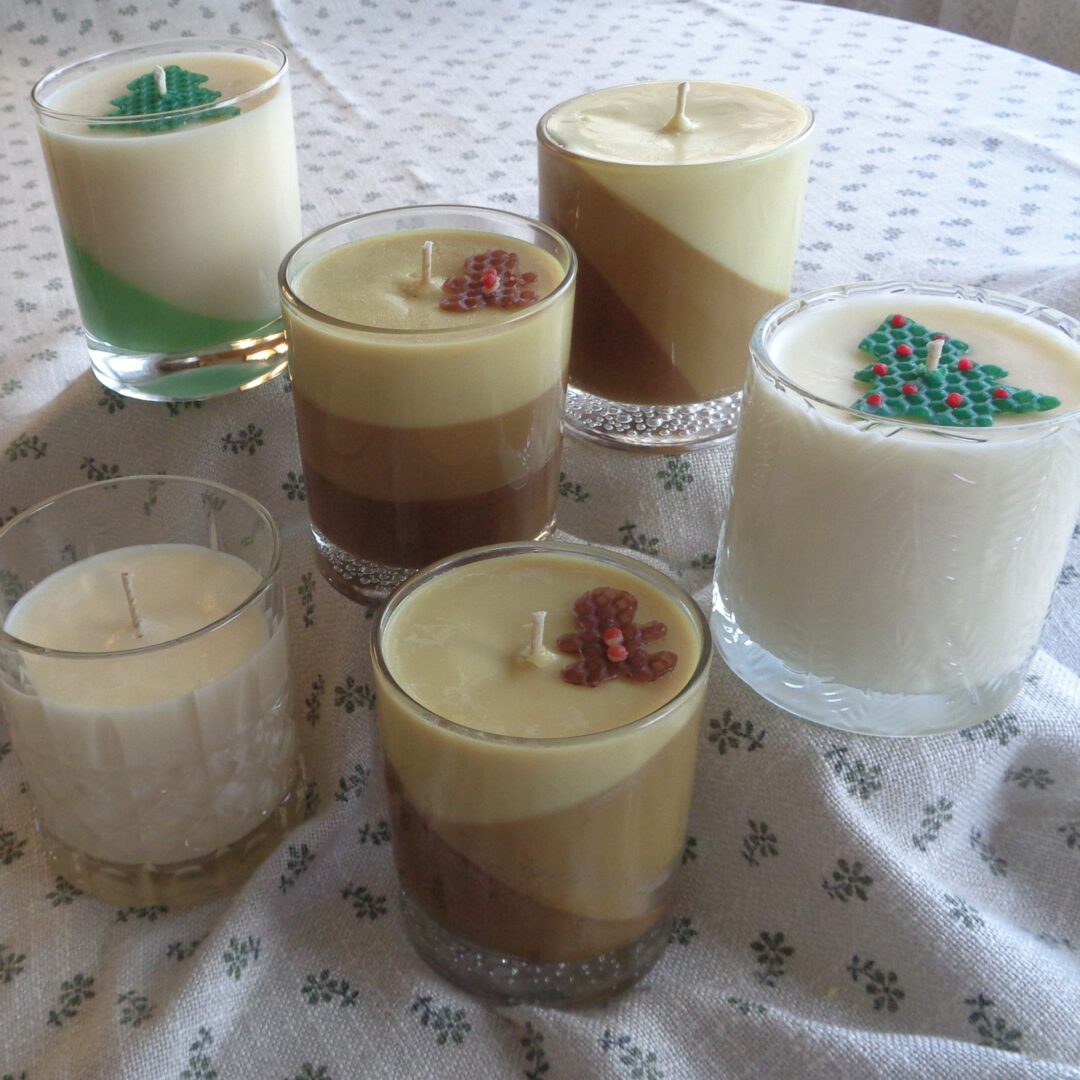
Candles are very often a lovely, cozy making gift for Christmas. Scented or not, it is always a good idea to know what your friends and family prefer and create accordingly. These candles were all made with a combination soy/coconut/bees wax and it has some specific requirements in order to be successful. Please read the first post where I was experimenting with temperatures, wicks sizes and technique before carrying on here. This post is more about the art of candle making but the science is just as important.
All waxes have unique personalities and what is possible creatively with paraffin for example, can be totally outside the capacity of soy. It is nice though to have a few options to explore and seeing that there are a few choices always helps get the juices flowing.
This is a new wax to my supplier, Wicks and Wax, and is called #3W917 Blend. It is a container wax which means it is too soft for a free standing pillar candle. It is also a melt and pour wax which means exactly that, the least amount of work is simply to melt the wax and pour into a container, add a wick and let cool. Scent and colour are optional.
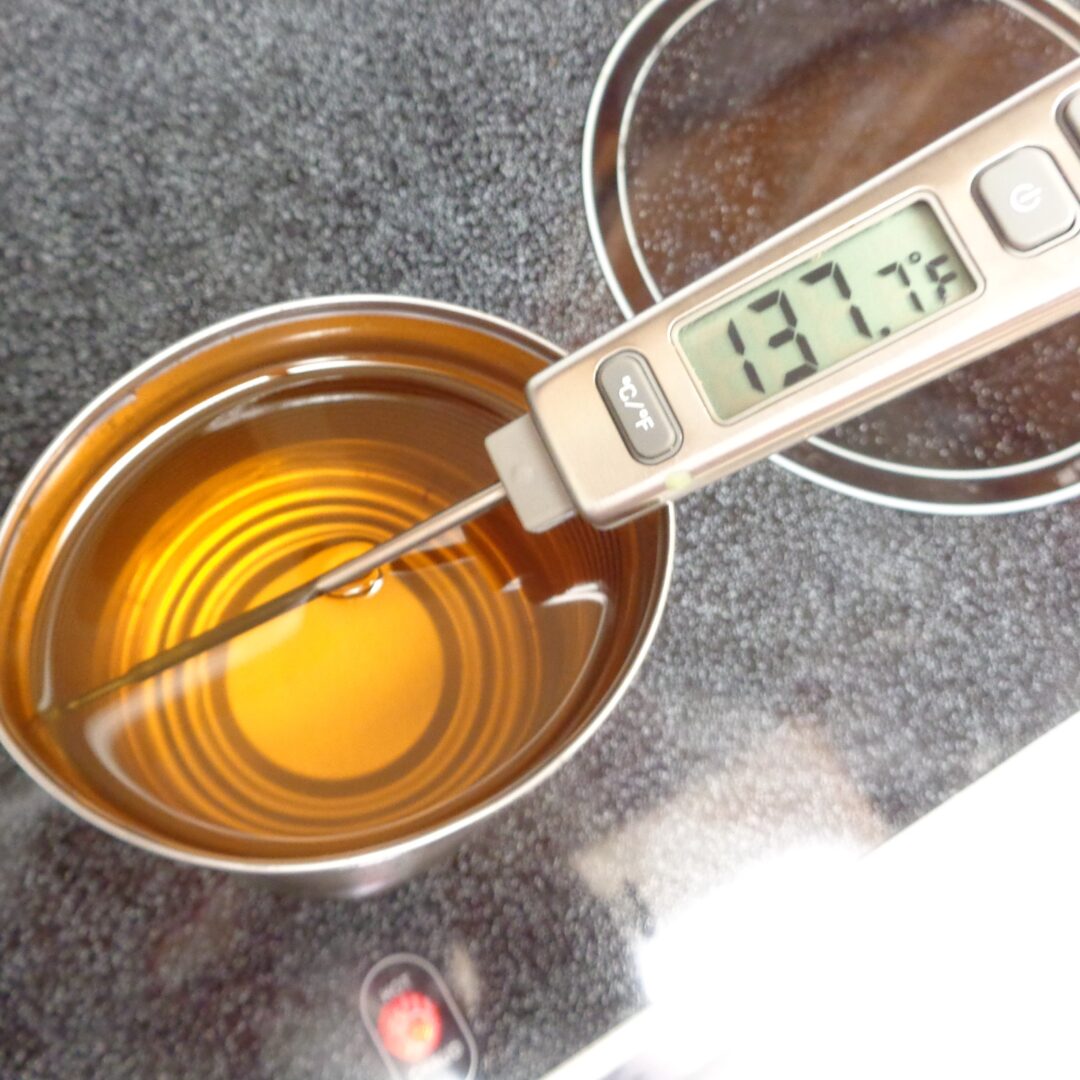 Once the wax has reached 170 degrees F, it can then be cooled down to between 130 and 140 degrees F before pouring. The simpler of the candles below were poured at just under 140 degrees F. while the more layered ones were closer to 130 degrees F. so as not to melt the previous layer and muddle the lines of colour. As the year gets colder, you might also consider using a hair dryer to warm up the glass before pouring. That may assist in the wax sticking to the glass.
 Simple unscented candles are my preference but I certainly enjoy playing with the wax and seeing what can be accomplished. I have these two container candle glasses that are usually combined with 126 wick and consistently give a nice burn. Once they are finished, it is an easy clean up and refill.
The instructions are very specific that the melted #3W917 Blend wax should be poured all at one time, so make sure there is enough melted wax to fill the container. ( These are a little short and could have had another 1/2 inch if I had calculated better.)
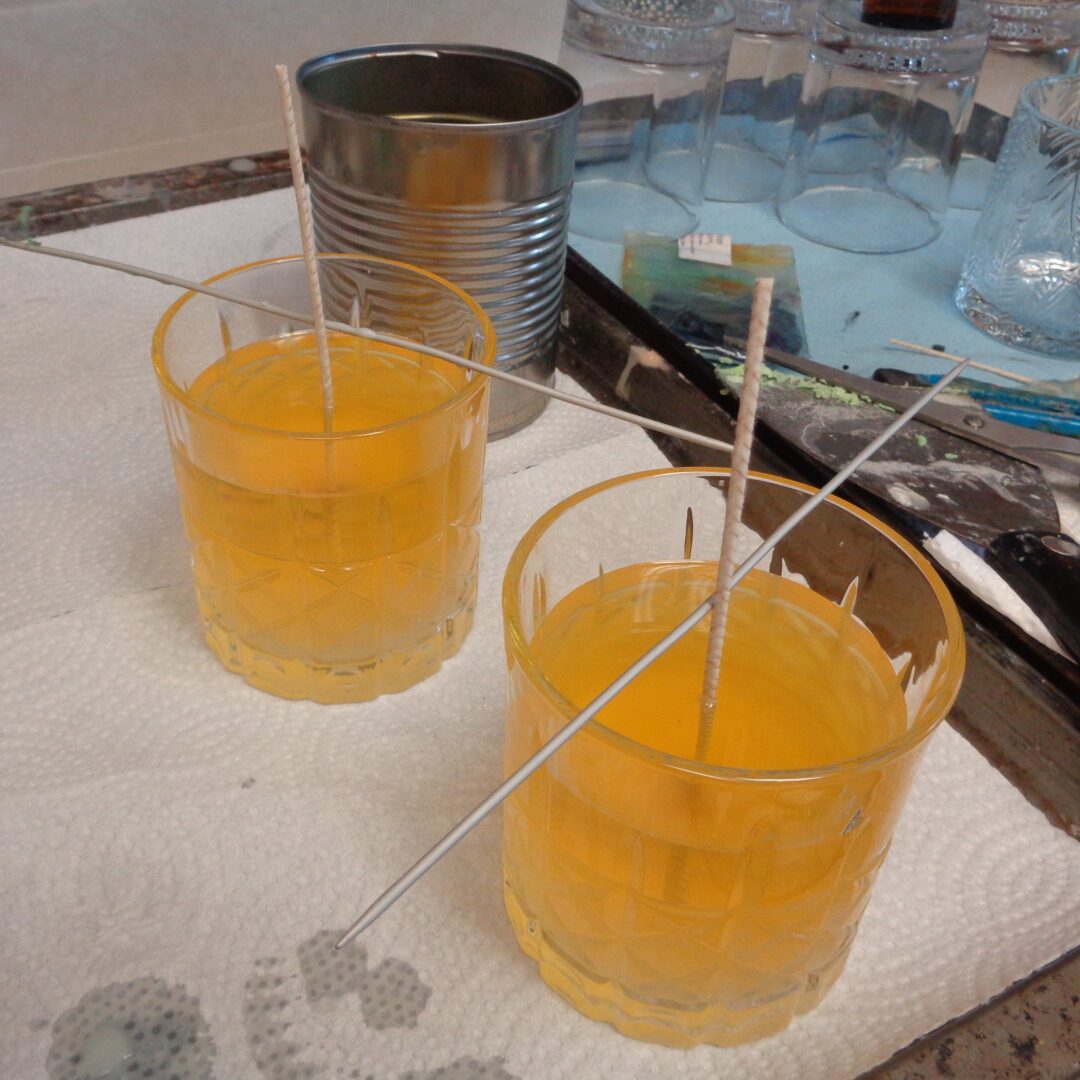
The knitting needles help keep the wick in the middle of the container and can be removed once the wax has cooled sufficiently that they can stand on their own. If the wick is being persnickety, try crossing two needles at 90 degrees to keep it in place. Pencils and similarly shaped items can also be used if knitting needles are handy.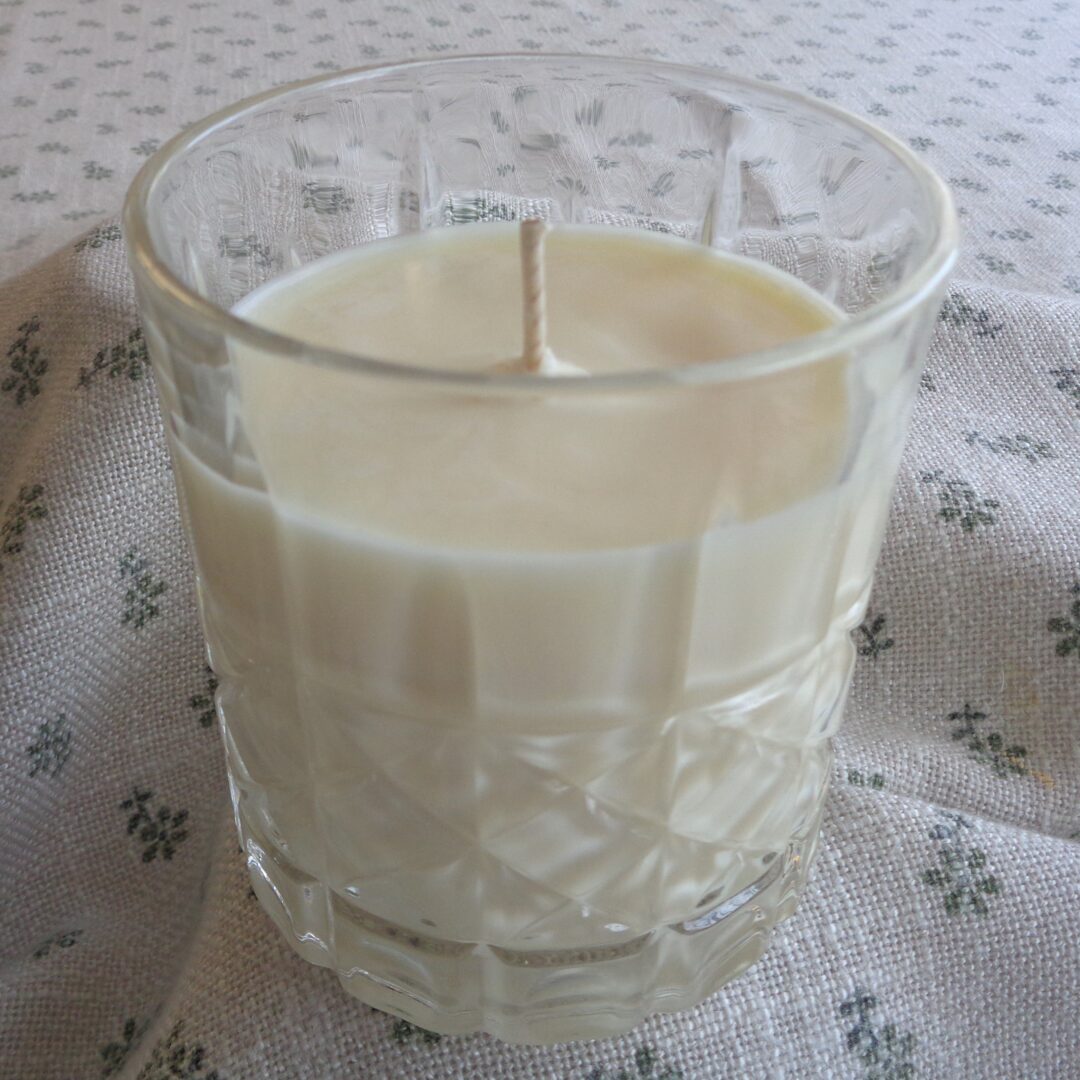 Notice the difference in colour between liquid and solid. The yellow undertones will need to be considered when adding dyes.
The fancier the glass container the simpler the candle works for me but exploring can be fun too. Also the wick above will need a trim before being lit. The average length of a wick should be 1/4 inch and there is much more about wicks in the post mentioned at the top of the page. Please read it before starting.
 When creating gifts, I like to consider the container, colour, scent and design. This candle has Christmas Memories scent added at a ratio of 7% by weight. The maximum load is 10% for this wax, a place I generally don’t go. Scent in this wax should go in at the very end, just before pouring and be well stirred to combine. Different scents have different viscosities and some are heavier than the wax it is being added to. Those scents will drop to the bottom, through the wax. Stirring well makes sure that all the ingredients combine together.
The outside pattern on the glass are branches of needles so a tree theme was appropriate for both the decoration and the scent. The tree on top is beeswax made with a mini cookie cutter and decorated with red balls of beeswax. The process is used again below for gingerbread men and there is a picture to help explain the process.
This is a clean, simple option, one pour and a little extra pizazz on top.
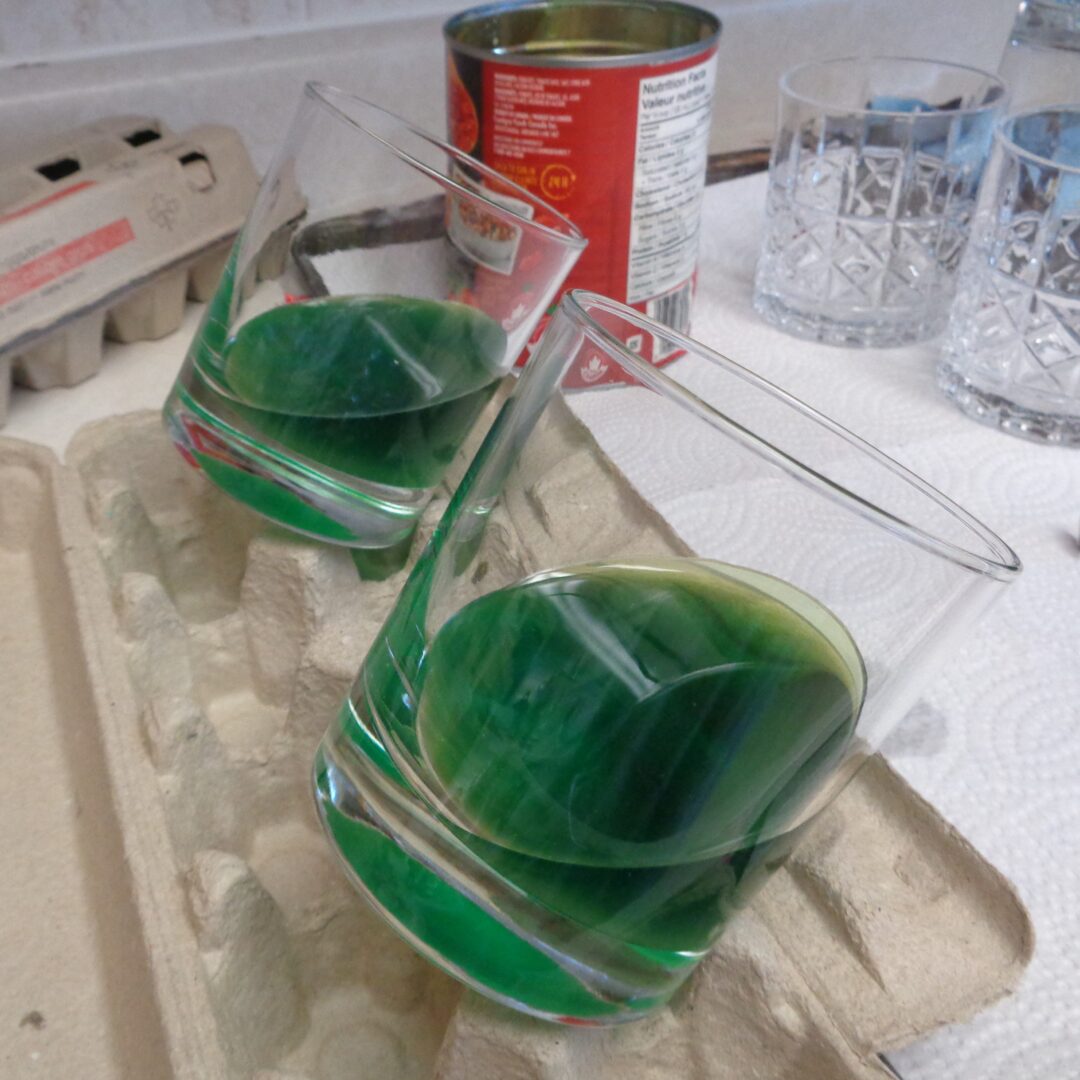 This next candle may remind you of desserts from the fifties, when the liquid jello was laid on an angle to set. It is the same principle. A plain container works best as the pattern will be more visible once dry.
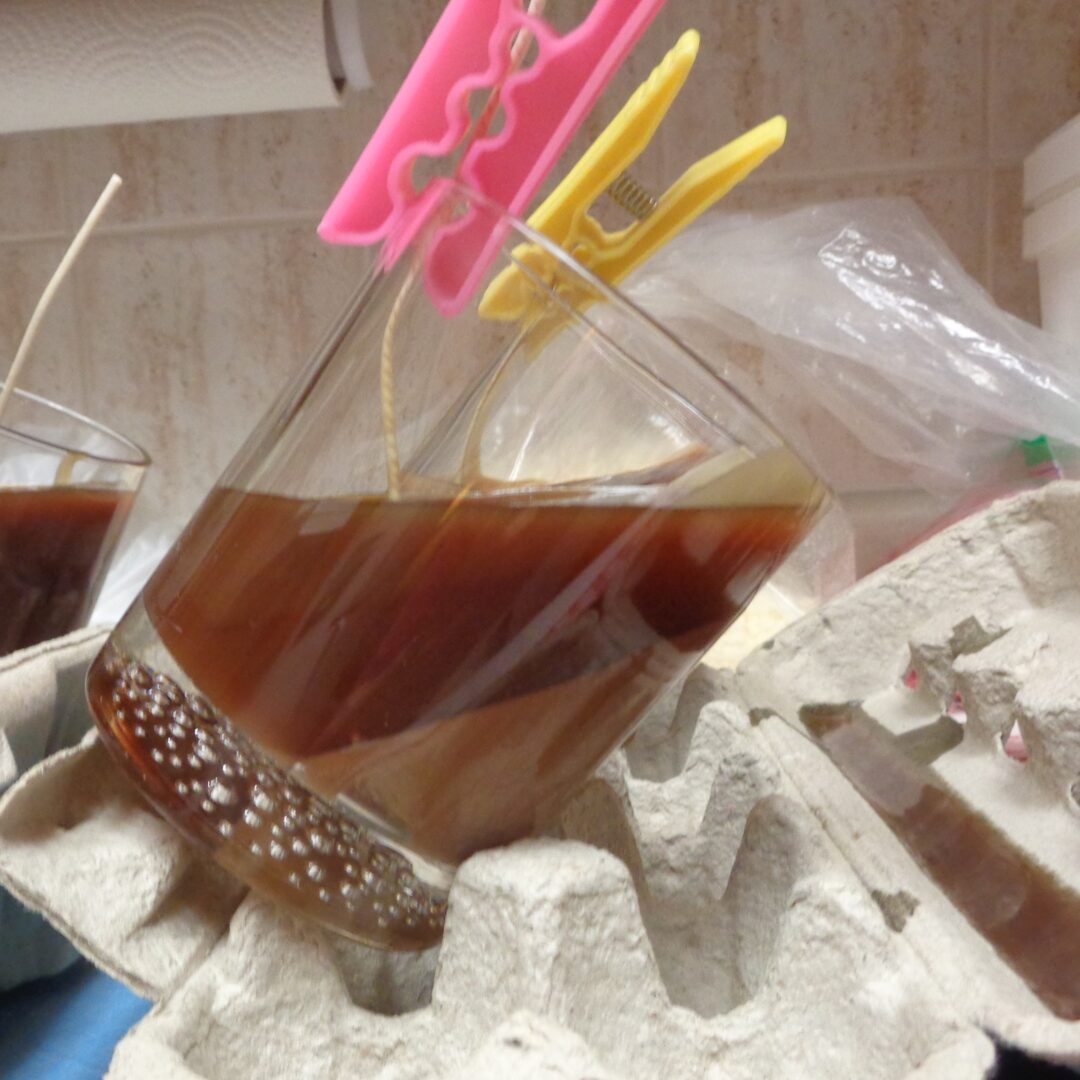
An egg carton was used to hold the angle but there may other options in your home. Pour the coloured wax as cleanly as possible. If things work well, the wax will look like the glass container at the back. If the container gets bumped there may be a line like the container at the front of the picture. There are two fixes. One is to shift the glass so the wax moves up to the first line and the section with just a little wax will be at the bottom and less visible if at all. Option two is to add just enough additional wax to bring the wax level again.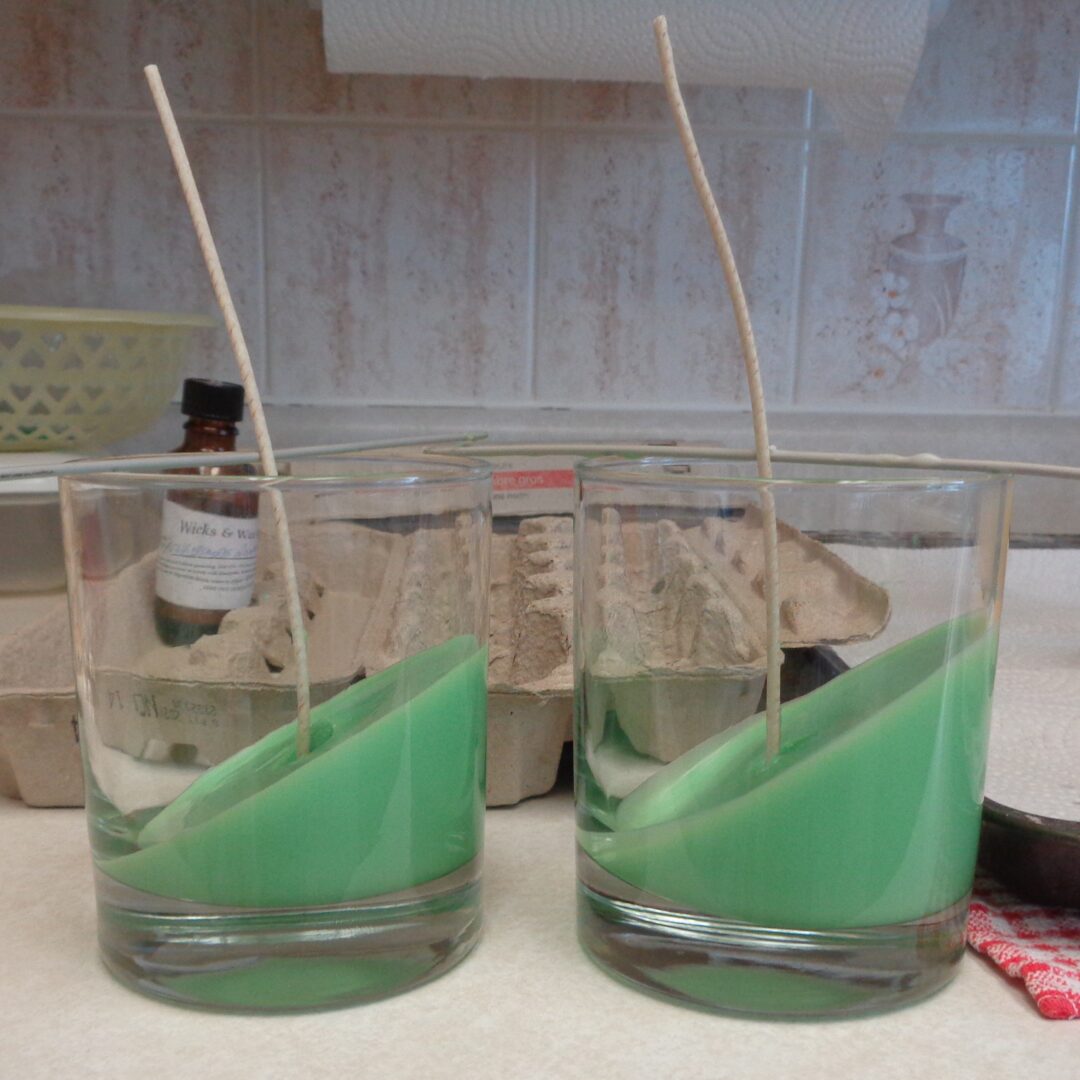 Let the wax fully dry. The wax will be soft enough to push the wick through and down to the bottom. Once dry and wicked it is time for the final fill.
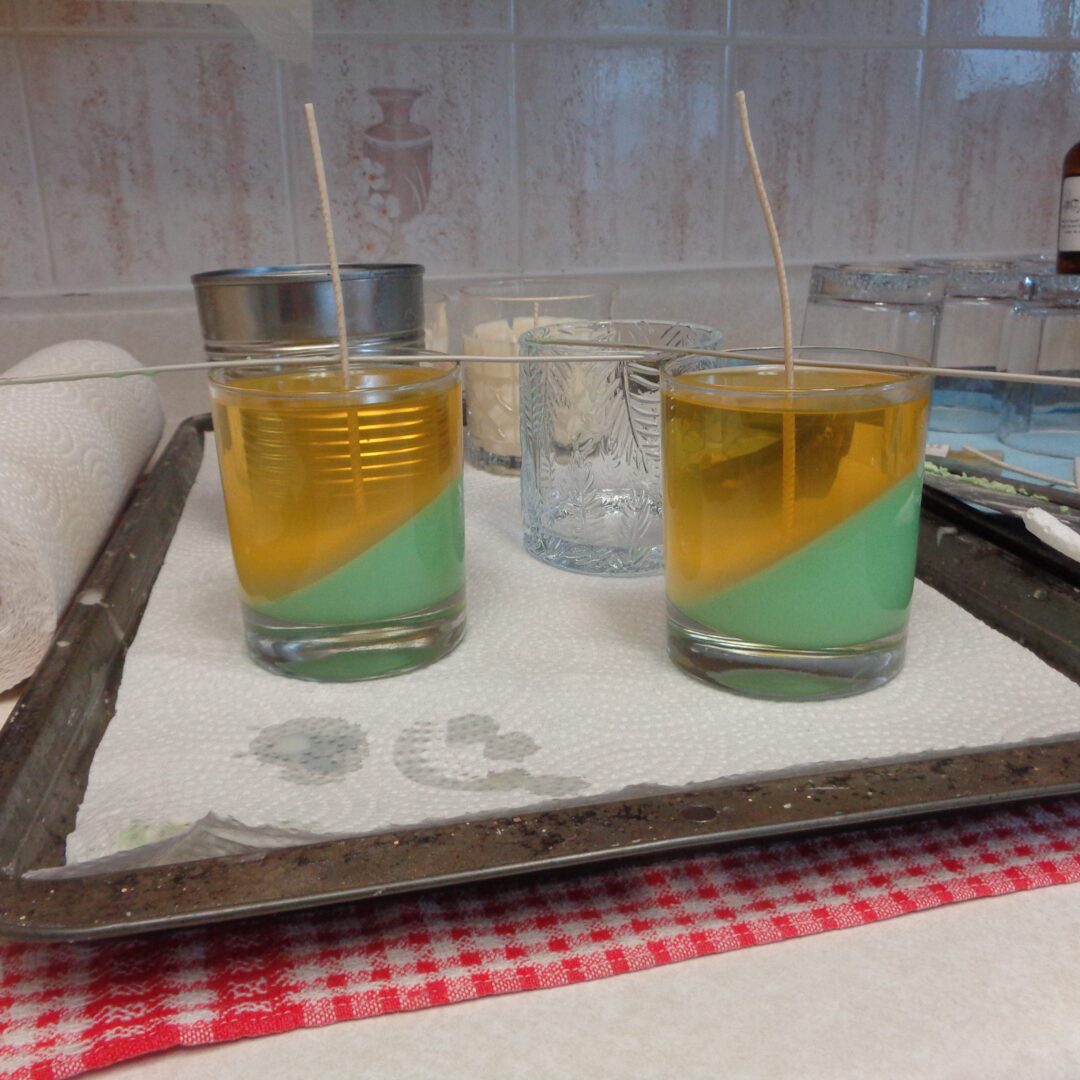 Remembering the yellow undertones, it is a good idea to add extra blue to the dye mix so that the finished candle is closer to green than teal. Once solid, this candle was topped with a plain tree cutout through which a hole had been poked so it could slide down the wick and rest on top of the candle.
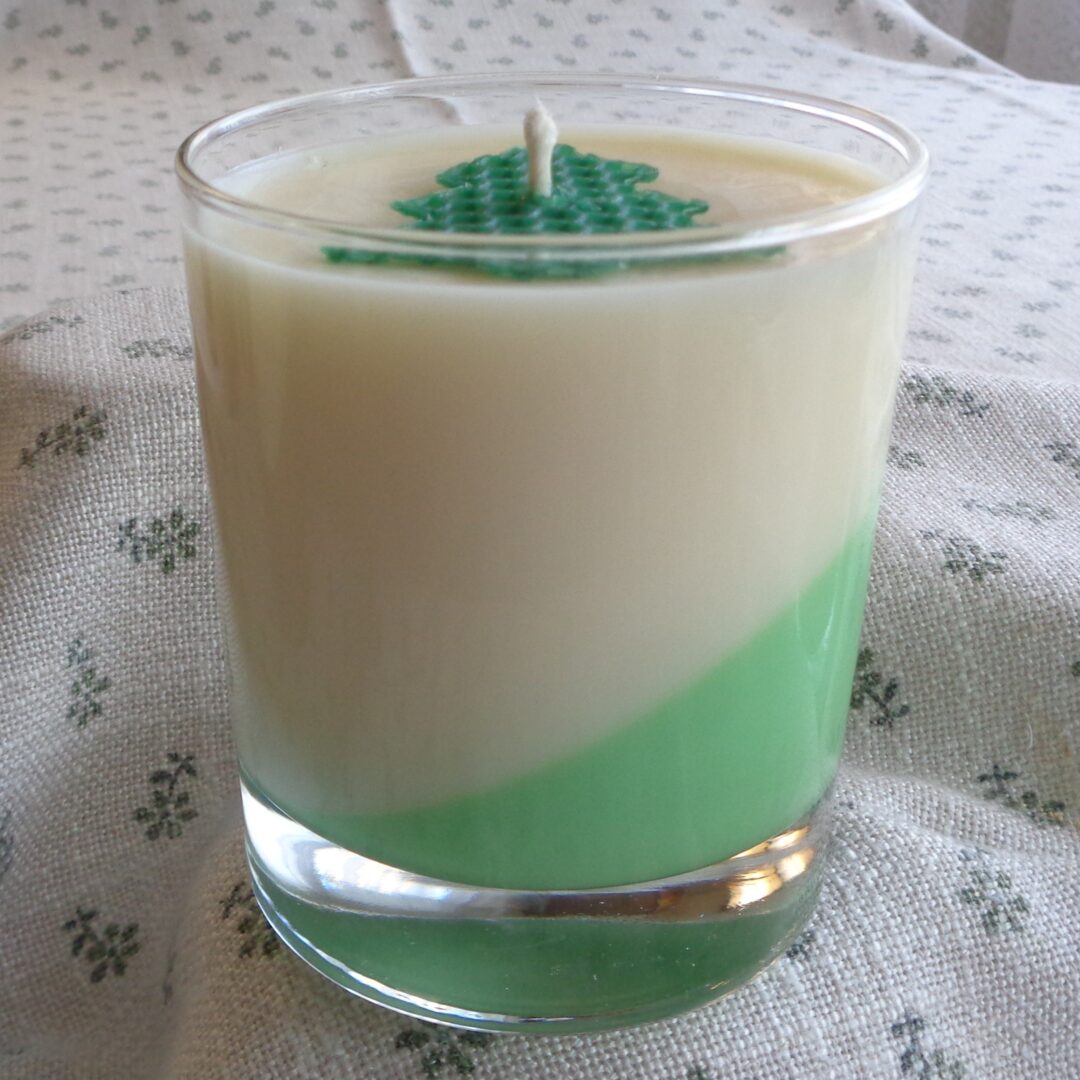 When choosing your glassware, I highly recommend paying attention to the bottom of the glass. Many quickly produced products do not have flat inside bottoms and that can change the outcome of the designs.
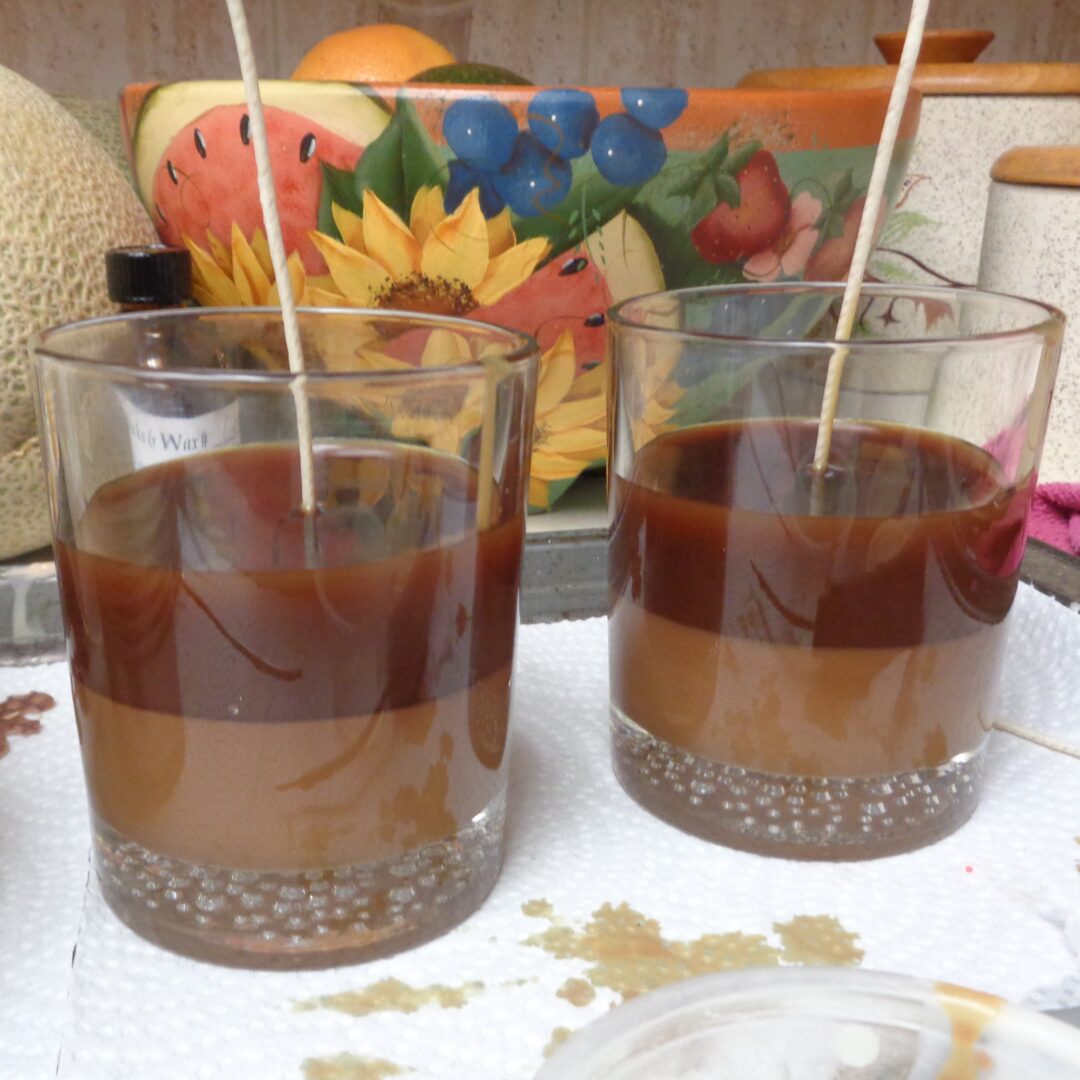
This next candle is basically the same as the candle above, with one added step. Once the first section is dry, the glass is turned around and filled again with a lighter coloured wax. It may look like a darker colour below but once the wax solidifies it will lighten. Make sure there is enough room left for the final pour to cover the brown wax, once the glass is stood upright.
 This would be a good time to explain the cutouts. As mentioned they are made with cookie cutters but that is not to say that a stencil or something freehand might not be another option. I used honeycomb beeswax as that was what was on hand. This was paired with Gingerbread Noel scent, making tones of brown the appropriate colour and gingerbread men an appropriate decoration.
The red of the buttons show up best against the brown of the “cookie” if there is a little white underneath the buttons. Take a very small piece of flat beeswax and roll it around between your fingertips or on a piece of cardboard. Best not to use a countertop as the beeswax will leave wax on the counter. Make red and white balls. The white balls should be a little larger so that they can be seen below the red buttons. Place two in the middle of the cutout. In truth you can add a face, three buttons or anything else your creative self desires. I am just sharing a starting point and hoping not to scare off first time candle makers but keeping it simple.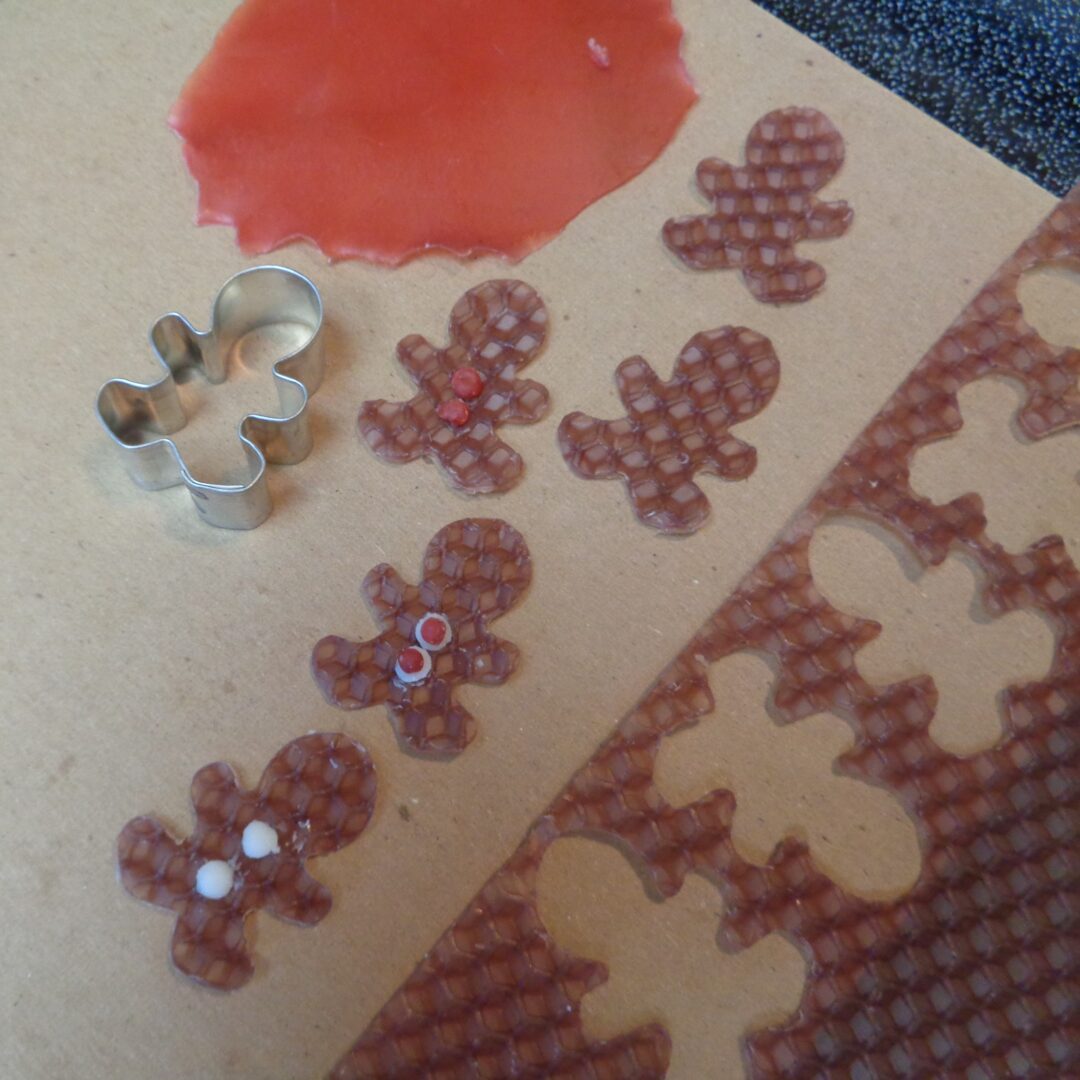 Now is a good time to show you that things don’t always go as planned. They didn’t because I did not leave the wax to cool for as long as I should have. Remembering the instructions that this is a wax best poured in a single pour, my mind went “two layers worked, let’s try three!”. The wax was solid on the outside but I did not leave these candles overnight before pouring the next layers. As there was still some heat inside the sections, this was the result. They looked great while cooling but not so much the following morning. I was able to fix it with a hair dryer but it is better to just wait the extra time as the hairdryer is not a guarantee. Run the hairdryer over the outside of the glass to warm the glass and the wax below. The intention here is not to melt the wax, simply to clean up the issues by softening the wax and having the wax reattach itself to the glass.
 This was an additional adventure that happened during play time. The glasses tipped and everything that spilled out is visible in the top of the egg carton at the right. So much for simple single pours.
To correct this issue, more than intended of the middle colour was poured into the container. That way there was less clean up of wax to deal with and the only part that needed correction was the section on the top right that is visibly thinner than the rest. It also meant that this candle would need filling all the way to the top to keep things neat.
The wick was clipped out of the way while the wax cooled and then was supported by the knitting needles for the final pour.
 Once everything was cleaned up, the final pours were completed and left to fully solidify. Like all candles that have been made from liquid wax, a good 24 hours of sitting before burning is needed while the molecular structure of the wax reformss itself.
One of the nice things about making candles at home as gifts is that nothing needs to match. So what if one candle is a little different from another? Get the basics right and each candle will have its own beauty. Once the candles are solid, clip the wicks down to a proper height. 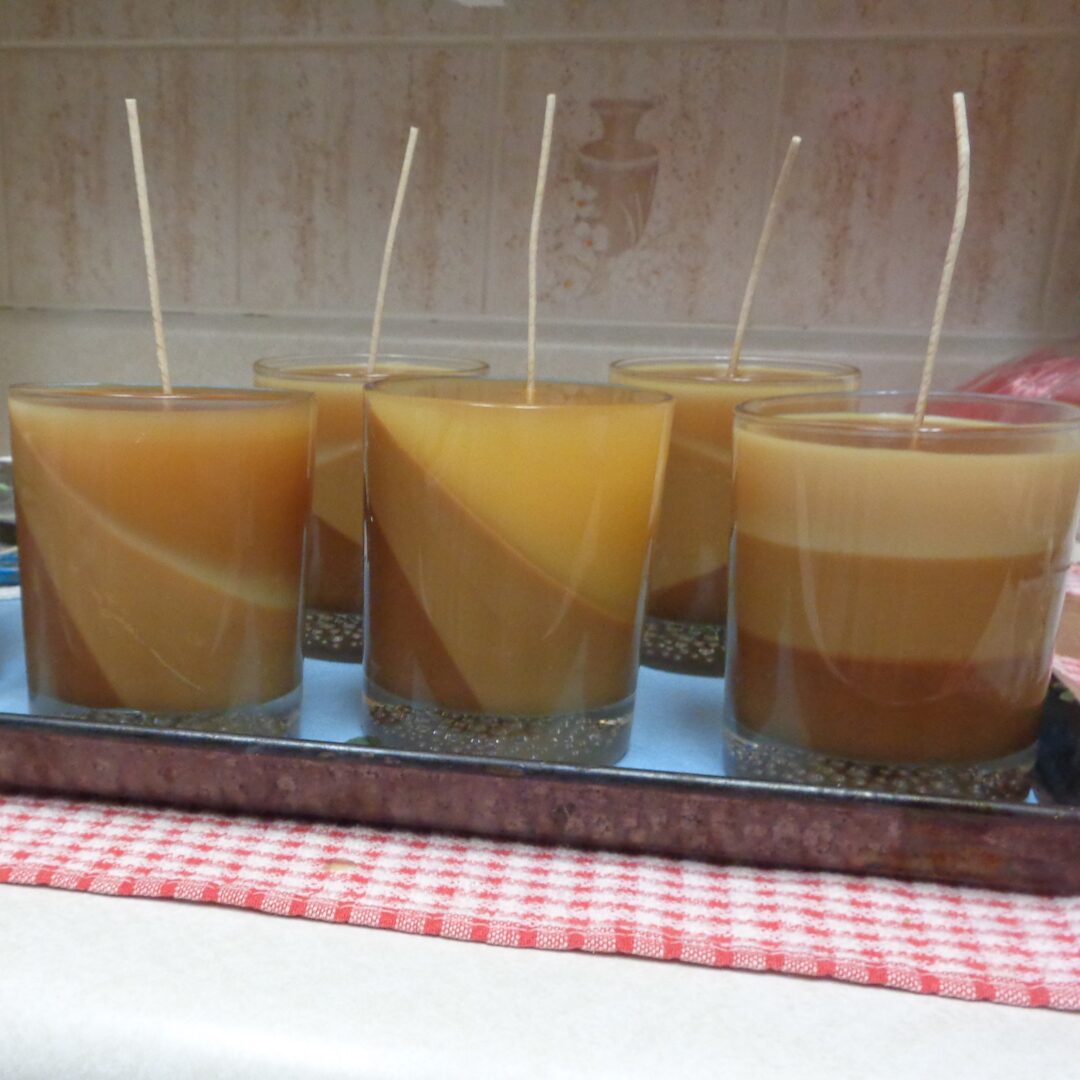 Oops! I didn’t show the last option. These candles were not tilted, but did get three layers of colour.
In German, there is a phrase, “frei nach schnauze”. It means free by the nose and is usually applied to cooking. I applied it to the colours used, so before anyone asks for specifics, the instructions suggested 1 cube of colour to 500gr. I put in four because I wanted a deep brown as the first pour and soy is notorious not good for dark colours. The extra dye will soften the wax as will the scent which is why there is only a little of the deepest colour at the bottom. I created enough wax to pour all six candles, two of each style and still have two inches of wax left at the bottom of the container. When it was time to pour the next layer, I then filled up the container with fresh wax again, melted the bits, added more wax to melt until the container was almost full and the wax tone lighter. 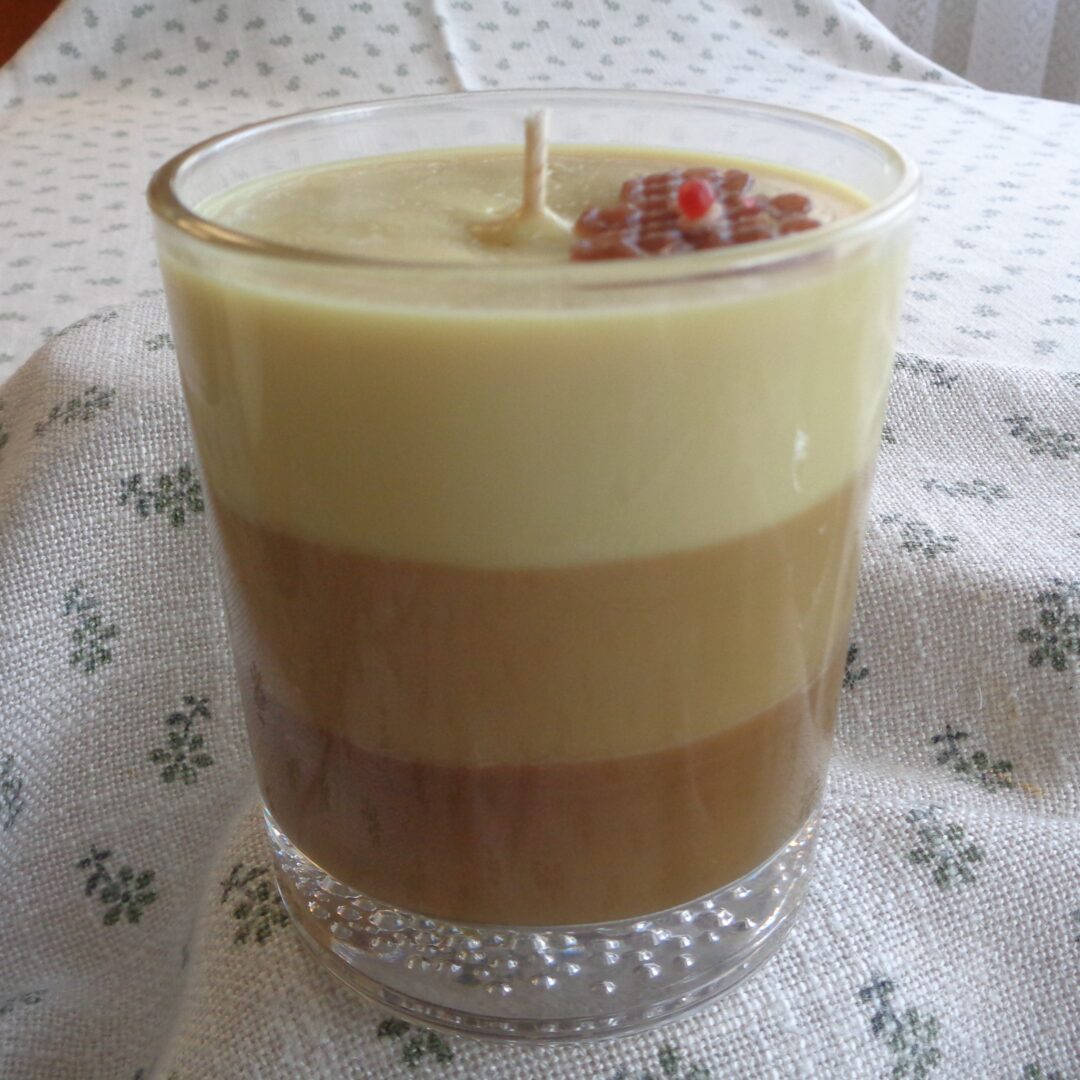 Once 170 degrees F. was reached it was taken out of the water and left to cool to 133 degrees F. The scent was added and thoroughly stirred before pouring. The process was repeated once more time with the remaining wax, making it lighter once again.
This idea can be changed up for all sorts of other occasions using hearts, flowers, pumpkins with the appropriate colours and scents.
So there you have it, a selection of candle making ideas for Yule with #3W917, a blend of coconut, soy & beeswax. Please read the previous post for the technical side of things before purchasing supplies and starting your adventure.